How to Set Up HomePod Multi-User Voice Recognition
How to Set Up HomePod Multi-User Voice Recognition. This article explains how to set up the HomePod Multi-User voice recognition feature
Author:Daniel BarrettSep 01, 2022138.2K Shares1.8M Views
How to Set Up HomePodMulti-User Voice Recognition– Apple’s HomePod speaker recognizes up to six people’s voices and tailors the music selection to an individual user’s taste profile, responds to their Requests, and also accesses their information to help them with everyday tasks.
Before you can use HomePod’s multi-user voice support feature, you have to set up the feature, and there are a few steps involved. This article explains what they are and also offers a few troubleshooting tips if you’re experiencing issues.
The HomePod has been subject to many questions like:
- Can HomePod recognize multiple voices?
- How do I enable personal requests on HomePod?
Can HomePod Recognize Multiple Voices?
In the AirPlay menu, you can choose whether you want to direct your audio to a single HomePod or multiple HomePods. You can also get specific, and tell different speakers to play different songs at different volumes.
How do I Enable Personal Requests on HomePod?
On your iOS device, open the Home app, press and hold HomePod, tap Settings, then tap Personal Requests under Siri. On your Mac, double-click HomePod, click Settings, then click Personal Requests. Turn on Personal Requests.
Check That Your Software is Up-to-Date
Firstly, you’ll need to ensure that your HomPod and iPhoneor iPad are updated to iOS 13.2 or later iPadOS 13.2 or later. You can check what software your iOS devices are running by opening the Settings app and selecting General ->Software Update.
Launch the Home app on your iOS device to check the software version of your HomePod, tap the home icon in the upper left corner of the display, then scroll down to Software Update. You can pull down from the top of the iPhone or iPad screen to check for an update if you need to.
Turn on Share My Location in Find My
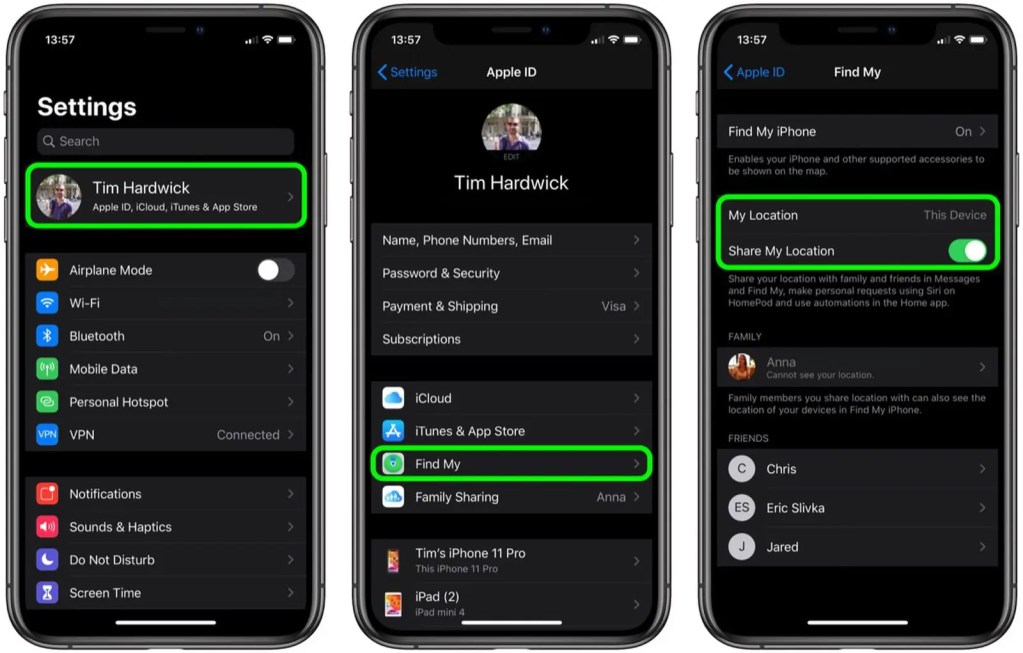
Secondly, you’ll need to turn on Share My Location to This Device on the iPhone or iPad of every user who wishes to be recognized by HomePod, including yours.
- Launch the Settingsapp on the iPhone or iPad.
- Tap your name in the banner at the top of the screen.
- Tap Find My.
- Tap the toggle next to Share My Locationto turn it to the green ON position.
- Next, set My Locationto This Device.
Add People to Your Home Network
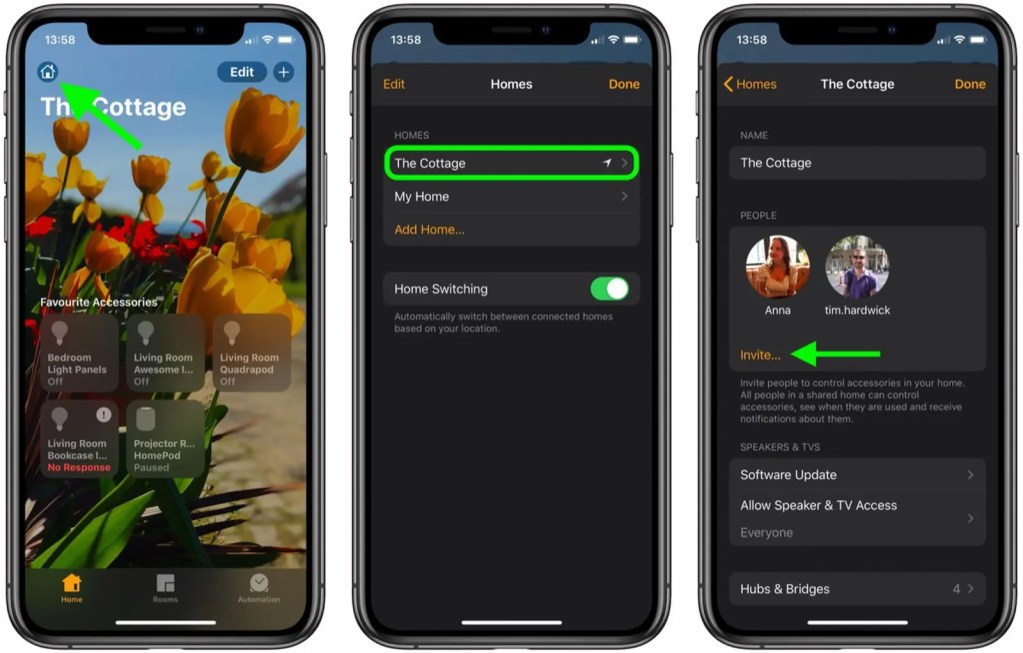
Whoever wants to be recognized by your HomePod must be part of your Home network. Here’s how to add them.
- Launch the Homeapp on your iPhone or iPad.
- Tap the home icon in the upper-left corner of the screen. If you have multiple homes set up in the Home app, tap Home Settings, then tap the Homethat you want to invite someone to.
- Under People, tap Invite….
- Enter the person’s Apple ID that they use with iCloud.
- Tap Send Invite.
Additional Settings to Check/Enable
You’ll also have to check the following settings on your HomePod and iOS device to ensure everything works.
Ensure Listen for “Hey, Siri”and Personal Requestsare enabled on your HomePod: In the Homeapp, press hold on your HomePod, tap the cog in the bottom-right corner of the screen, then toggle the requisite switches. On the same screen, check also that the Languageis set to English. (Siri on HomePod multi-user only supports English at this time.)
Ensure Listen for “Hey, Siri”is enabled on the iOS device of every user who wishes to be recognized by HomePod, including your device. The associated toggle can be found in Settings ->Siri &Search. On the same screen, check also that the device is set to the same Languageas your HomePod.
Likewise, location services should be enabled on the device of every user who wishes to be recognized by HomePod: Go toSettings ->Privacy ->Location Services, and make sure the Location Servicestoggle is green.
Editor’s picks:

Daniel Barrett
Author
Daniel Barrett is a tech writer focusing on IoT, gadgets, software, and cryptocurrencies. With a keen interest in emerging technologies, Daniel offers expert analysis and commentary on industry trends. Follow him for authoritative insights into the latest tech innovations.
Latest Articles
Popular Articles