How to Change Margins in Google Docs
This article shows you two proven ways to change the Margin in Google Docs. Click the link to read the full guide.
Author:Daniel BarrettJul 10, 202218390 Shares328397 Views

A margin in Google docs is an unused space around a document; it could be on the top, bottom left, or right sides. It can even be in the middle of your workspace that does not have any text or images. Margins are the lines that keep your text from clashing with the edges of the article. This article shows you two proven ways to change the Margin in Google Docs.
There are two proven ways to set Margin in Google Docs.
- Use of ruler to set the Margin by dragging it with the mouse.
- Type the Margin (in inches) in the page setup dialog box.
How to Change the Margin in Google Docs Using the Ruler
- Go to Google Docs and open a new or existing document.
- Find the ruler at the top of the document.
Don’t miss:How To Insert A PDF Into Microsoft Word
- Find the rectangular bar with a downward triangle beneath it to modify the left Margin.
Beneath the Margin, set the Top, Bottom, Left, and Right margins to whatever you want. Choose OK when you’re done.
- Select the grey area to the left of the Down-pointing triangle. The pointer will turn into an arrow, then drag the grey margin area to adjust the margin size.
- To alter the right Margin, locate the down-pointing triangle on the right end of the ruler, and then drag the grey margin area to adjust the margin size.

You should know it’s important to adjust your right or left indents when modifying your Margin. For example, when you select and drag the blue rectangle icon above the down-facing triangle, you need to adjust the first-line indent. However, if you select and drag only the down-facing triangle, you’ll adjust the left or right indents, not the overall margins.
How to Change the Margins in Google Documents Using “Page Setup”
- On Google Documents, Open A new File or an existing one.

- Click on “Page Setup…”
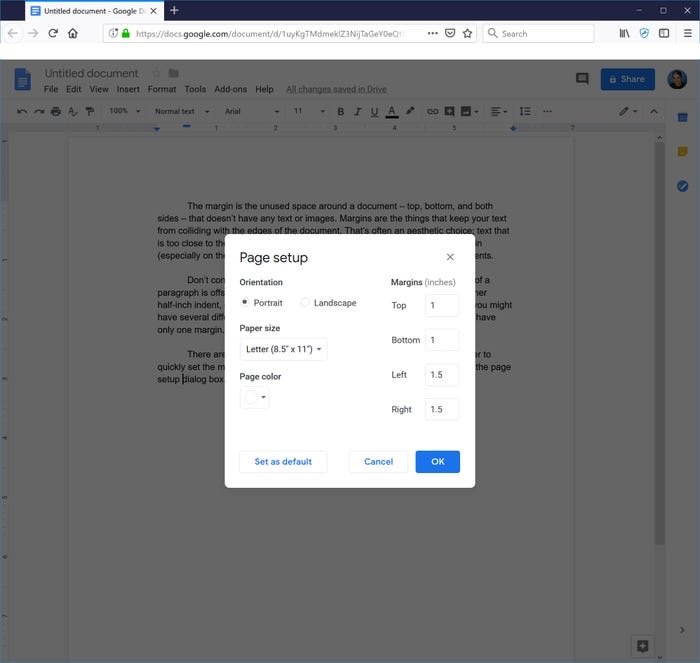
- Finally, Click OK.
Editor’s picks:

Daniel Barrett
Author
Latest Articles
Popular Articles