How to Record Your GamePlay with NVIDIA ShadowPlay
This guide explains how to record your GamePlay with NVIDIA ShadowPlay. Click the link to read the full guide.
Author:Daniel BarrettSep 02, 202212.4K Shares1M Views
Formerly known as NVIDIA’S ShadowPlay, NVIDIA Share is a program that helps in easy gameplay recording, live streaming and also FPS counter overlay. This guide explains how to record your GamePlay with NVIDIA ShadowPlay.
The program automatically records gameplay in the background on the PS4 and XboxOne and it can also be instructed to stop too.
This feature is present in PCs with modern NVIDIA graphics hardware. NVIDIA ShadowPlay can be compared to Windows 10’s Game DVR but the NVIDIA has more features than Windows.
Note:Recording with ShadowPlay will decrease your game performance by a bit. NVIDIA notes that a performance penalty of 5% is typical, while it could be 10% in more demanding games.
The above doesn’t matter when you have a compatible PC. Programs like this eat up system resources including Windows 10’s Game DVR feature. You can disable it when not in use.
PC Recommended Requirement for ShadowPlay
Before further information is provided, you need to make sure that your PC is compatible with the requirements for ShadowPlay.
In addition, if you already possess either a GSAS or VAST PC, this means that the GeForce Experience is already installed on your computer. Otherwise, you can download it from Nvidia’s website, along with all the drivers you’re going to need for a smooth performance.
If you want to be absolutely positive that your computer supports Nvidia Share, you should launch the GeForce Experience and check the Share Capacity and My Rig options in the Preferences menu.
Keep in mind that you’ll need at least 4GB of RAM memory and an Intel i3-2100 processor on 3.1 GHz to accompany your GTX 650 series, Nvidia Graphics card if you would like to use the ShadowPlay application.
However, for you to avoid slow gameplay and gain a better recording experience, we recommend:
- 8GB RAM
- i7 CPU
- Recorded footage stored on an SSD or HDD (SSD is preferred)
- GTX 660 Graphic card
- An updated version of GeForce Experience
You can start recording your gameplay with NVIDIA ShadowPlay as soon as you confirm that all your drivers are current and your PC meets every requirement.
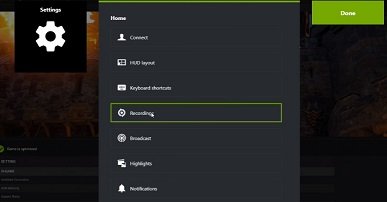
Configuring Settings on NVIDIA ShadowPlay
Follow the following steps to configure your settings:
- Click the icon at the bottom of the ShadowPlay window.
- Select “shadow mode” to use the previous five minutes for recording.
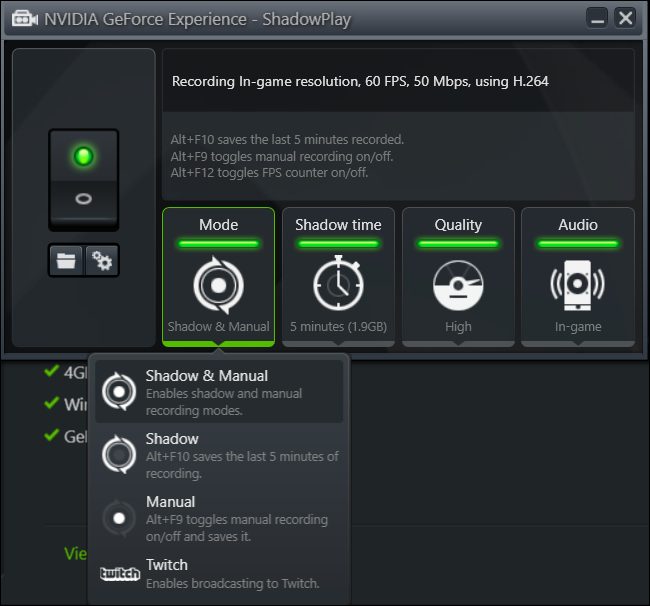
- Use the “Manual” to simply record gameplay manually.
- Another mode is the “Twitch” option which is used to broadcast your gameplay to Twitch rather than saving it to your hard drive.
- “Shadow time” gives you the choice of how much gameplay ShadowPlay saves in its buffer. Anytime between 1 and 20 minutes is available according to your preference.
- Quality Option: This allows you to configure the quality of your recording. In default, it is set to high and records the video at high resolutions. You can choose other options such as low or medium. You can also select Custom and change the settings individually
- Audio Option: Provides a variety of audio tracks that you can include in your recorded video. The default for this is to include every in-game audio. You can also select “In-game and microphone”, allowing you to speak into your microphone and have that inserted into the recording, or select “Off” to disable all audio recordings.
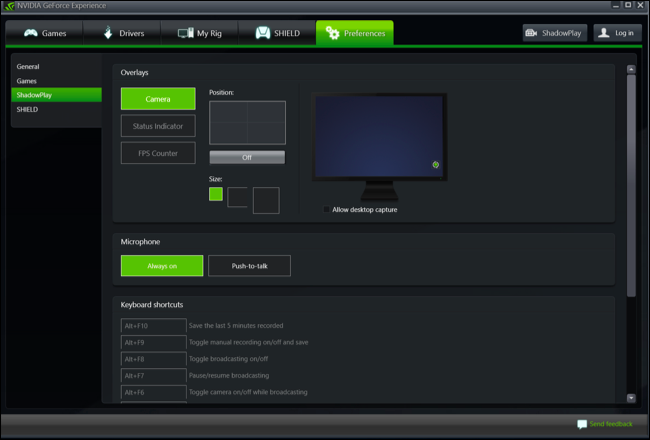
- Preferences Screen: This allows you to choose overlays. You can overlay your webcam, FPS counter or even status indicator and decide where they appear. You can also choose between “Always On” and “Push-to-talk” for your microphone if you opt to include yours.
Also read: How To Block And Unblock Someone On Facebook
Using the NVIDIA Share to Record Gameplay
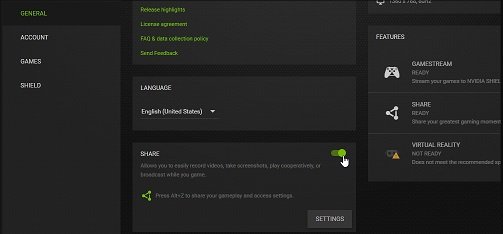
Step 1: Launch GeForce Experience and Enable Share Feature
Launch the game you want to record and then minimize it. Also, open the GeForce Experience window and make sure its sharing feature is available. Do this by clicking on the settings icon and browsing through the General section where the Share feature resides. You can simply toggle it off and on.
Step 2: Audio Recording Settings
After the sharing feature is enabled, click the Open-in-Game-Overlay icon located next to the settings icon in the upper right corner of the screen.

Step 3: Webcam Recording Settings
Click on the camera icon to enable the webcam, if this fails, head over to the settings menu in the GeForce Experience main window. Find the In-Game-Overlay and switch it on under the General tab.
Step 4: Setting up Hotkeys
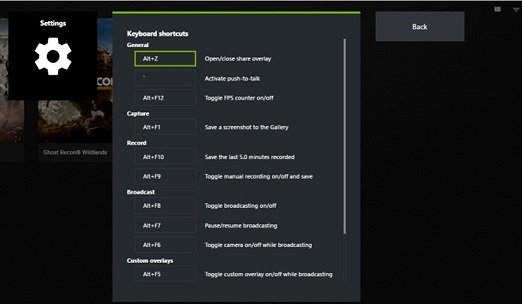
Gamers that want to use this application on a constant basis can configure hotkeys in order to speed up the gameplay recording process. You’ll need to head over to the Settings menu and click on the Keyboard Shortcuts option.
Customizing the hotkeys is simple. You can set the keyboard keys as hotkeys that you find the easiest to use during a gameplay recording session.
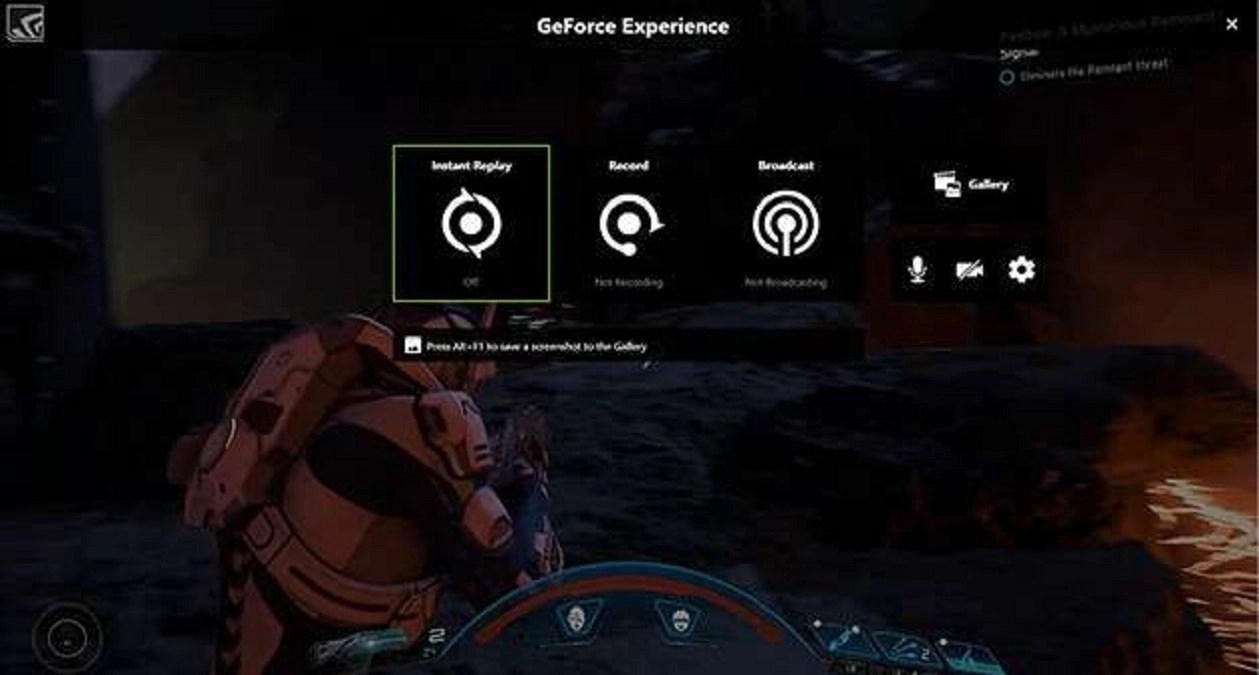
Step 5: Choose Recording Types, Instant Replay or Record
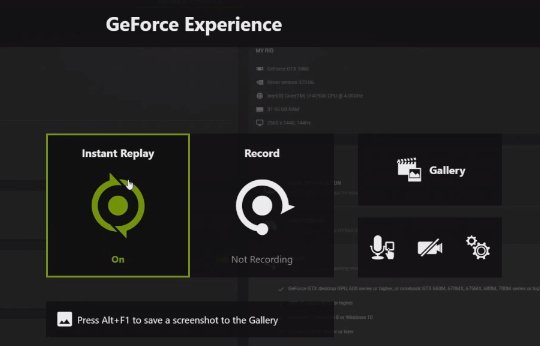
The Instant Replay feature should be used if you want to capture special moments from the video games you play, which have already happened, while the Record option is best used while the gameplay is still in progress.
If you would like to use the Instant Replay option, click on it and then click on the Customize button, to tweak the settings to match the requirements of your video recording session.
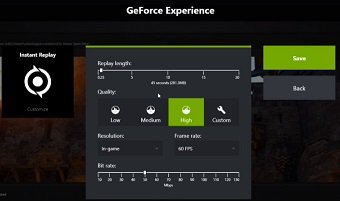
You’ll be able to adjust the duration of the replay, the output video quality as well as the video resolution, frame rate, and bitrate. The Recording menu will enable you to adjust the exact same settings as the Replay menu, but using both of these options while recording can slow down the gameplay.
In most cases, you can just use the default settings, as the high option is the best choice for the video quality you can make, and record in in-game resolution will enable you to produce a video that has a good quality.
Experimenting with the settings is advised only if you have the particular requirements you need to meet and if the video-sharing platform to which you want to upload the video has limitations that prevent you from recording the gameplay in the maximum quality ShadowPlay has to offer.
Step 6: Record Your Gameplay with ShadowPlay/Nvidia Share
To start recording gameplay, click on the Record icon in the Open-In-Game-Overplay and hit start. You could also use the hotkeys on your keyboard to start, pause and stop recordings.
Bottom Line
The NVIDIA is very user-friendly and easy to learn. You can record gameplay to create content for tutorials and even bragging rights with it.
Editor’s picks:
Jump to
PC Recommended Requirement for ShadowPlay
Configuring Settings on NVIDIA ShadowPlay
Using the NVIDIA Share to Record Gameplay
Step 1: Launch GeForce Experience and Enable Share Feature
Step 2: Audio Recording Settings
Step 3: Webcam Recording Settings
Step 4: Setting up Hotkeys
Step 5: Choose Recording Types, Instant Replay or Record
Step 6: Record Your Gameplay with ShadowPlay/Nvidia Share
Bottom Line

Daniel Barrett
Author
Daniel Barrett is a tech writer focusing on IoT, gadgets, software, and cryptocurrencies. With a keen interest in emerging technologies, Daniel offers expert analysis and commentary on industry trends. Follow him for authoritative insights into the latest tech innovations.
Latest Articles
Popular Articles