How to Manage Purgeable Storage on Your Mac
In this article, we are going to talk about purgeable space on your Mac computer and how to manage it. We will discuss what exactly...
Author:Daniel BarrettSep 05, 202244K Shares587.4K Views
In this article, we are going to talk about purgeable storage on your Mac computer. We will discuss what exactly is meant by purgeable space, how it can affect your system, and what you can do to manually administer this type of storage.
For some Mac users, there’s no such thing as enough computer space. No matter how large your hard drive is, somehow you always end up with flash drives, external disks, or miles of cloud storage.
Based on the name, you may think that purgeable space is simple to get rid of. But Apple doesn’t make it very easy. As a workaround, it could require some technical tweaking. In any case, here’s everything you need to know about purgeable storage on your Mac.
What is Purgeable Space?
Purgeable space is a special Mac feature for optimizing storage. It represents files that your Mac can remove if more space is needed, but can also be redownloaded at any time. The files in purgeable space are more of a redundancy feature.
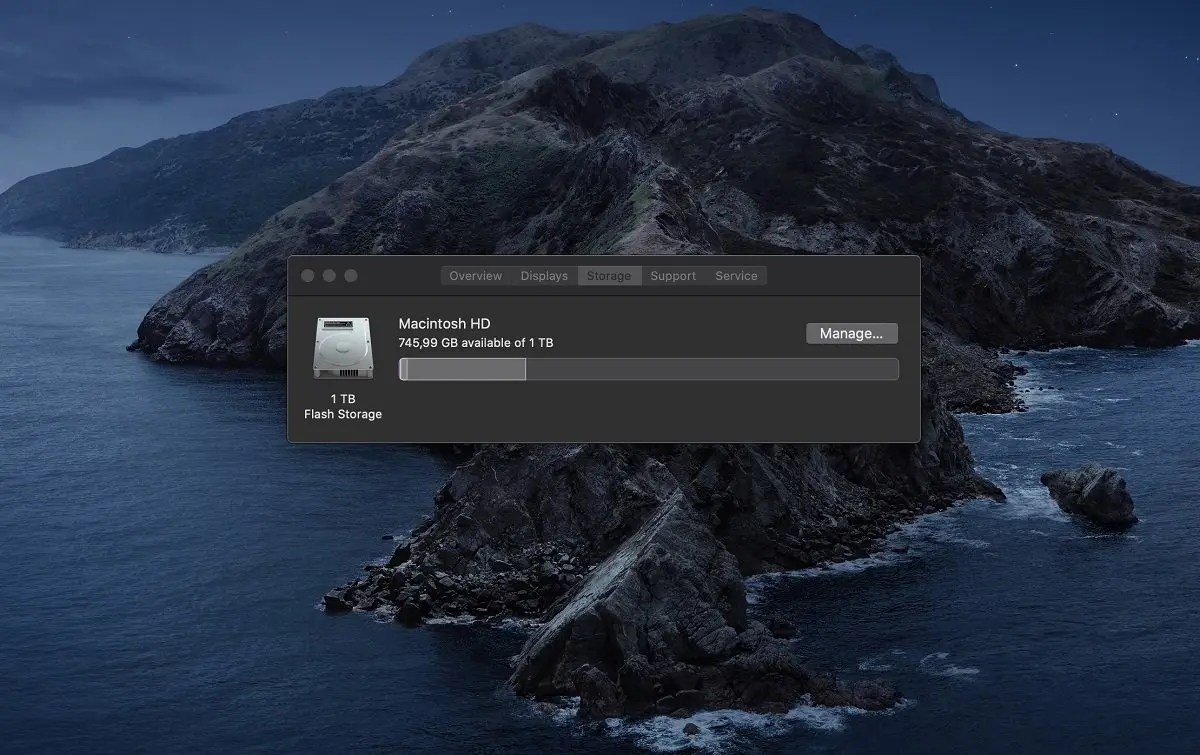
Here’s how to check your storage. First, head to the Apple menu —> About This Mac —> Storage. Purgeable space shows up as white space with a diagonal gray pattern over the top.
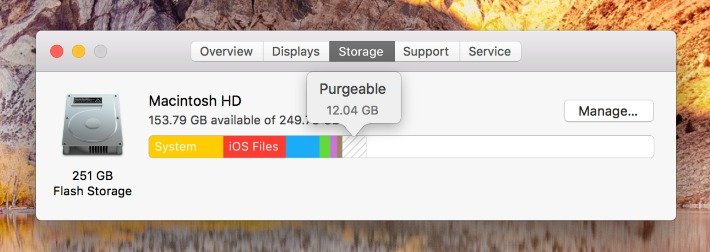
You’ll see a breakdown of the files on your Mac. The area with the grey diagonal lines should say “Purgeable” when you mouse over it and tell you how much space those files are taking up.
If you don’t see that section, it may be because you don’t have Optimize Storage turned on. To do so, click the Manage… button to the right of the storage bar. You’ll see the following pop-up.
Under “Optimize Storage”, click the Optimize button. Once complete, a checkmark will show up.
Purgeable Space vs Clutter
Purgeable space is not the same thing as having cluttered files on your computer. Purgeable space is a Mac feature, it lets your Mac make extra space automatically when needed without permanently getting rid of files.
On the other hand, regular clutter is things like duplicated photos, files leftover from uninstalled programs, and stuff that you don’t use often and could be offloaded to the cloud or an external disk.
How to clear out Purgeable Space
So purgeable space is space that isn’t necessary, so you can go about safely clearing it out, right? Theoretically, yes. But the problem is that the fact that Apple doesn’t allow users to clear out purgeable space manually.
There are a few other options and workarounds for clearing out additional space on your Mac’s drive, including purgeable storage, however. Here are a few that work.
Method 1: Optimize Mac Storage
Applying some of these storage-saving settings to your Mac may clear out purgeable files.
Apple first introduced the idea of purgeable space back in macOS Sierra, when it also debuted a new Optimized Storage feature to the Mac ecosystem.
There are conflicting reports about whether Optimize Storage causes purgeable space or whether it can help clear it out. But while your mileage may vary, heading to Optimize Storage and trying out some of the options are worth a shot.
- Click on the Apple icon in the top menu bar.
- Click About This Mac.
- In the window that pops up, click on Storage to bring up the storage pane.
- Click the Manage button.
From here, you should see several options that could help clear out the storage space on your Mac. That includes storing files and photos in iCloud, optimizing storage by clearing out email attachments and media content, emptying the trash automatically, and reducing clutter.
Try these out and see if it makes a difference in your purgeable storage.
Method 2: Open up that Terminal
You can also “force” macOS to clear out purgeable storage by attempting to download or install a large file. It can be hard to find a file large enough to fill your Mac’s disk, but you can just create one yourself.
This method relies on using the Terminal, so you may want to skip it if you aren’t comfortable with Terminal commands. In any case, it’s effective (as noted by its creator, software engineer Brian Ambielli.)
Note:System commands like these can be dangerous. Make sure to copy and paste the following commands or type them exactly as they appear.
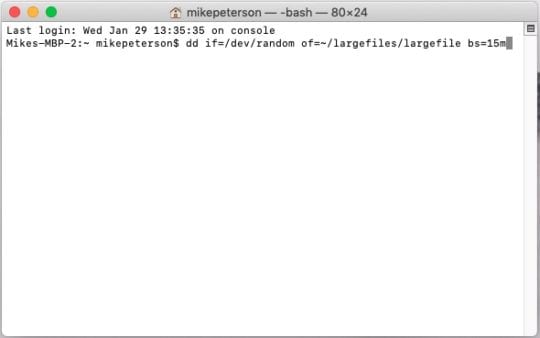
- Open the Terminal app by typing that into the Spotlight search bar.
- Type the following command into the Terminal window: mkdir ~/largefiles
- Hit Return.
- Now, type in this command: dd if=/dev/random of=~/largefiles/largefile bs=15m (It’s normal for your Terminal to look like it’s frozen. That’s just the command at work.)
- After about five minutes or so, hit Control + C in Terminal to stop the previous command.
- Now, type in this command: cp ~/largefiles/largefile ~/largefiles/largefile2
- Once that’s done, type the same command in, but change the last number to “3.” After it runs, change the last number to “4,” and so on.
- You’ll want to continue this cycle until you see a macOS message appear that says “disk is critically low.”
- Once you do, type in and execute this command: rm -rf ~/largefiles/
- Head to the Trash Bin and empty it.
- Essentially, what this is doing is creating a single large file and storing it in a system folder called “largefiles.” Then, using the third terminal command, you’re copying the large file in its entirety over and over again.
The last command will delete all of the large files. (Though they’ll keep taking up storage until you clear out the Trash Bin.)
Note that you won’t be able to achieve similar results by just copying a large file over and over again in Finder. That’s because if you just use copy/paste or Command + D, macOS just creates a reference to the old file instead of creating a brand new file.
Method 3: Use A Third-Party App
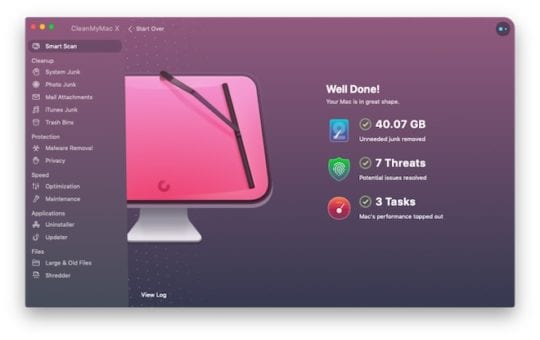
If you want to get rid of clutter and free up some space, you can use CleanMyMac X. This tool will automatically find remnants of old apps, and other useless items for you, and then delete them.
First, download CleanMyMac and install the app on your Mac. When you open it, click the scan button at the bottom of the window.
You’ll then see exactly how many files can be removed. Make sure to click “review” and uncheck anything you think you might want to keep, and then press Run to remove the files and save some space!
CleanMyMac X is free if you have a Setapp subscription or about $35 for a personal license. Alternatively, you could try an app from our list of best Mac cleaners.
Conclusion
There are advantages to manually deleting extraneous files from your Mac rather than waiting for the system to purge them when space becomes too tight. You have complete control over which files are deleted from your machine. This ensures that a file that you haven’t accessed in a while but still want around won’t suddenly go missing.

Daniel Barrett
Author
Daniel Barrett is a tech writer focusing on IoT, gadgets, software, and cryptocurrencies. With a keen interest in emerging technologies, Daniel offers expert analysis and commentary on industry trends. Follow him for authoritative insights into the latest tech innovations.
Latest Articles
Popular Articles