How To Tether Your Laptop With An IPhone And PdaNet
When you tether your laptop with an iphone and pdanet, you are not just putting a stop to the current music session; you are also protecting the functionality, battery life, and overall lifespan of your device. You give yourself the ability to become an expert at this necessary activity when you recognize the necessity of correct shutdowns and when you follow the step-by-step guide.
Author:Daniel BarrettOct 18, 2023253.8K Shares3.3M Views
When you tether your laptop with an iphone and pdanet, you are not just putting a stop to the current music session; you are also protecting the functionality, battery life, and overall lifespan of your device. You give yourself the ability to become an expert at this necessary activity when you recognize the necessity of correct shutdowns and when you follow the step-by-step guide.
The power button serves as your instrument for optimising the operation of your iPod Classic and guaranteeing that it will continue to be a source of delight and enjoyment for many years into the future.
Learn how to properly shut down your iPod Classic as part of your daily routine, and you'll be amazed at how much this seemingly insignificant habit improves the overall quality of the user experience.
Remember, as you delve into your favorite playlists and rediscover vintage tunes, that the act of shutting down your iPod vintage is a testament to your dedication to preserving its top performance. This is something to keep in mind as you go about your musical exploration.
Best Ways To Tether Your Laptop With An iPhone And Pdanet+
PdaNet, on the other hand, comes with a significant cautionary note that users should be aware of. You are not permitted to tether your device under the Terms of Service of the basic AT&T iPhonecontract, as well as under the terms of their normal Data Plans. The vast majority of users just disregard this information and continue to use tethering services despite the warnings, taking care not to exceed the recommended limits so that AT&T does not charge them additional costs or even cancel their service. Continue reading for a step-by-step guide on how to set up PdaNet so that it can tether to your laptop if you don't find that information concerning.
Step One - Jailbreak Your iPhone
This step may be the most stressful of the whole process, so don't worry about it. Jeremy has been really helpful in providing us with clear and concise instructions that will walk you through every step of the procedure. During this process, pay close attention to the area labelled "Customize your firmware." You will need to make sure that the box labelled "Add Cydia" to your firmware is checked, as there is a location where PdaNet can be found.
- How to Unlock an iPhone 3G Using a Macintosh Computer
- How to Unlock Apple's iPhone 3G Using a Personal Computer Running Windows
- How to Jailbreak an iPhone of the First Generation Using a Windows Computer
To celebrate the fact that you have successfully jailbroken your iPhone, you might want to take a brief detour to look at the Top 5 Must-Have Jailbreak Apps.
Step Two - Set Up Cydia
After you have successfully jailbroken your iPhone, the next step is to install the PdaNet app. Cydia, is an application that acts very similarly to the more well-known installer. app in that it connects you to a large number of other applications that have been jailbroken, which is where you will do your installation. However, likely, Cydia will not yet be up to date when you first start it, so we will need to make sure that it is updated as soon as possible.
First things first, fire up Cydia and proceed through the tutorial panels as they appear on your screen. It will ask you to make certain "Essential Upgrades," which you ought to accomplish as soon as it allows you to do so. It may also prompt you to choose the kind of interface that you want; nevertheless, I went with the simplest one possible, and I recommend that you do the same thing.
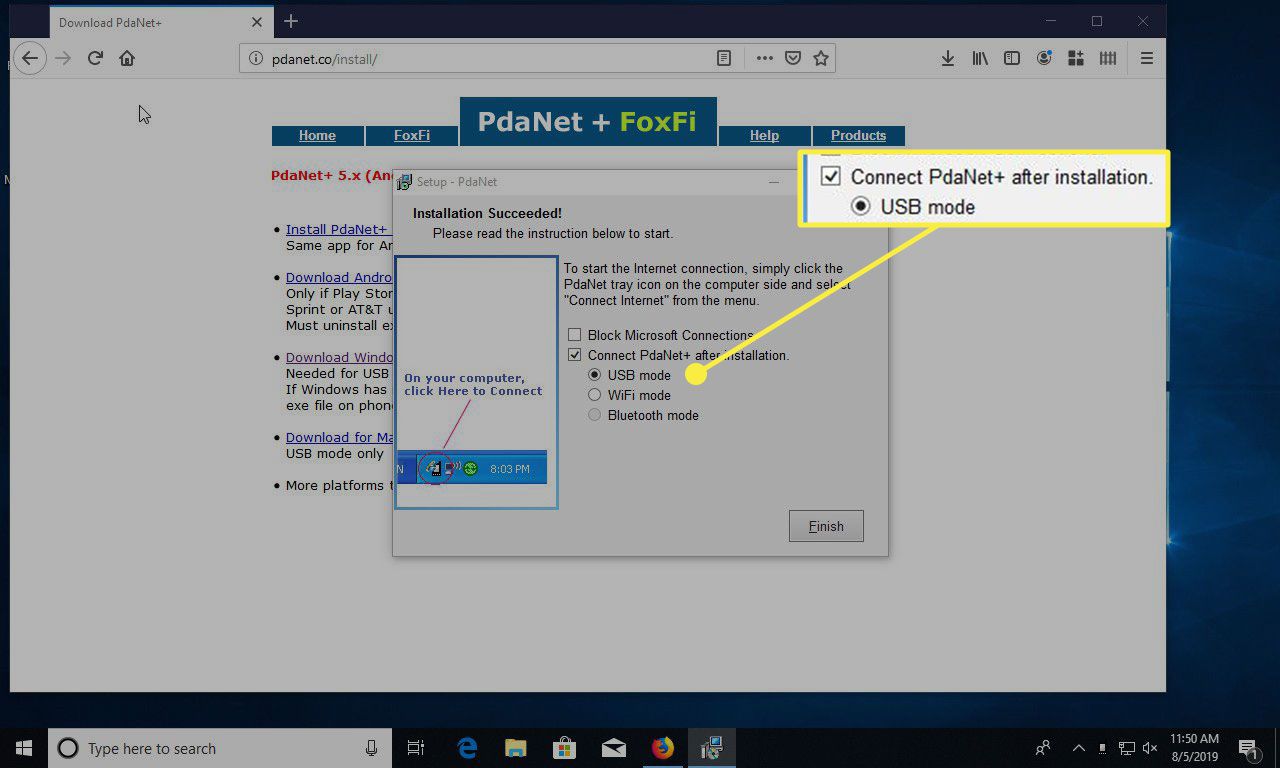
Step Three - Install Pdanet
Now that Cydia has been brought up to date, you can utilize it to successfully install PdaNet. Tap the Search tab, which may be found in the lower-right corner of the screen. Simply typing "planet" (or just "PDA") into the search bar at the top of the screen will auto-filter the list of all available apps down to the one we want, which is PdaNet. After that, select PdaNet from the list.
You will be presented with an information screen regarding PdaNet. After you have tapped the "Install" button in the upper right corner, followed by the "Confirm" button in the upper right corner of the following screen, you can then observe the installation process as it takes place.
Step Four - Set Up An Adhoc Wi-Fi Network
Even though PdaNet is a full-fledged Wi-Fi router, it does not set up a WiFi network that other devices, including your computer, may join. Instead, what you'll need to do is make what's called an "Ad Hoc Wi-Fi Network" on your computer, and then connect your iPhone to that network once it's been made. The result of this is that your computer will be instructed to set up a Wi-Fi network and will be given permission to allow other computers on that network to share internet connections. When this occurs, your iPhone will take on the role of one of those 'computers,' and your laptop will be able to access the network it provides.
Although at first glance it would appear to be difficult, doing so is quite straightforward. The good newsis that you shouldn't have to undertake the difficult tasks again once you've mastered them the first time. When you wish to tether your device for the second time, all you have to do is switch to that Ad Hoc network and turn on PdaNet.
Step Five - Connect Your IPhone To Your Ad Hoc Wifi Network
Now get your hands on your iPhone and navigate to the Settings app. Tap the Wi-Fi icon, and then choose your freshly created network. Enter your password, and then give yourself a little grin because you're almost finished.
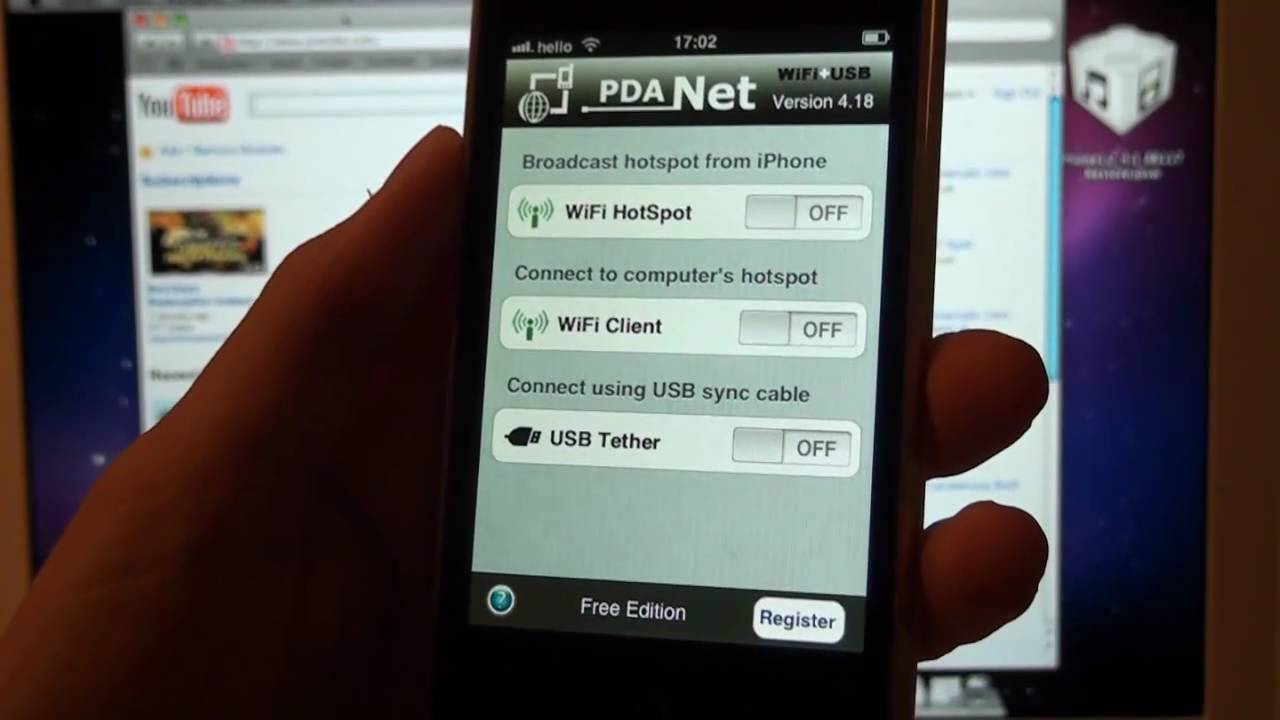
Step Six - Open Pdanet
At this point, you should press the home button and then launch PdaNet - It will first verify that your Wi-Fi connection is of the appropriate type, and then, after it has established that this is the case, it will "Just Work." You will be able to know because PdaNet will transition to the next screen, which will identify the connected machines and the data that has been exchanged.
Since you are going to be using your iPhone quite a bit, we are going to go ahead and recommend that you plug it in to maintain its battery charged, as you are going to be draining the battery. Be careful not to utilize an excessive amount of data because doing so could raise a red signal with AT&T, as was mentioned at the beginning of the post.
PdaNet does include a function that allows you to exit out of it so that you can check out another application; but, you should be aware that it will shut down if you do not return to it in a reasonable amount of time. Although I haven't put it to the test just yet, I have a sneaking suspicion that Backgrounder will make it possible for PdaNet to continue running in the background indefinitely.
How to Tether your iPhone with your computer using PdaNet
Step Seven - Turn Off Pdanet And Celebrate
When you are finished, you can exit PdaNet by toggling the switch located at the bottom of the program, and then return to your computer to reset the network settings to what you would typically employ. Congratulations, you've reached the level of mobile mastery! You must begin by establishing an ad-hoc network as a first step.
- Navigate to the Control Panel and then click on Network Connections.
- Select "Properties" from the context menu after right-clicking the "Wireless Network Connection" icon.
- The "Wireless Networks" tab should be selected.
- Just hit the "Add" button.
- In the SSID box, type in a name for your wireless network, such as "iPhone."
- Uncheck the box that says "The key is provided for me automatically" so that you can improve the level of security.
- Entering a "Network Key" and then validating it is necessary to prevent unauthorized access to your network.
- See to It. "This is a computer-to-computer network, also known as an ad-hoc network; there are no wireless access points used."
- Simply tap the "OK" button.
- If your computer is already connected to a router, you won't be able to see your newly created network on your iPhone until you navigate to Settings > WiFi and look for it there. Choose your network, and if you have one set up, enter the WEP key there.
- Go to "View Wireless Networks" on your personal computer.
- Choose the network that you just established.
- At this point, all it should do is try to make the connection, but it's okay if it doesn't connect.
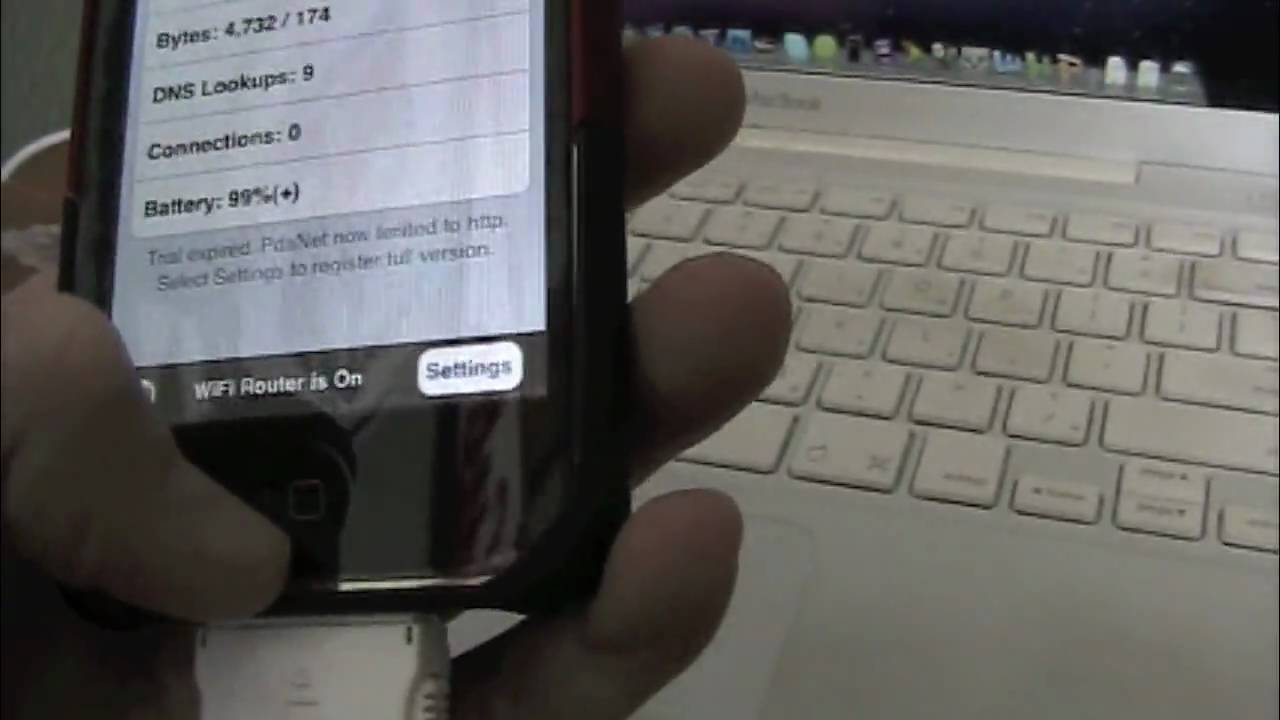
- Launch PdaNet on your Apple iPhone.
- Activate the Wi-Fi router.
- That wraps it up!
Let's move on to the less exciting stuff, shall we? It took me some time to get everything set up, even though it seemed to be rather simple. My iPhone's WiFi settings did not reflect the presence of my network for some unknown reason when I checked them. After repeating the same steps over and over for what seemed like a good 20 minutes, I was eventually successful.
People Also Ask
How Does The Pdanet System Operate?
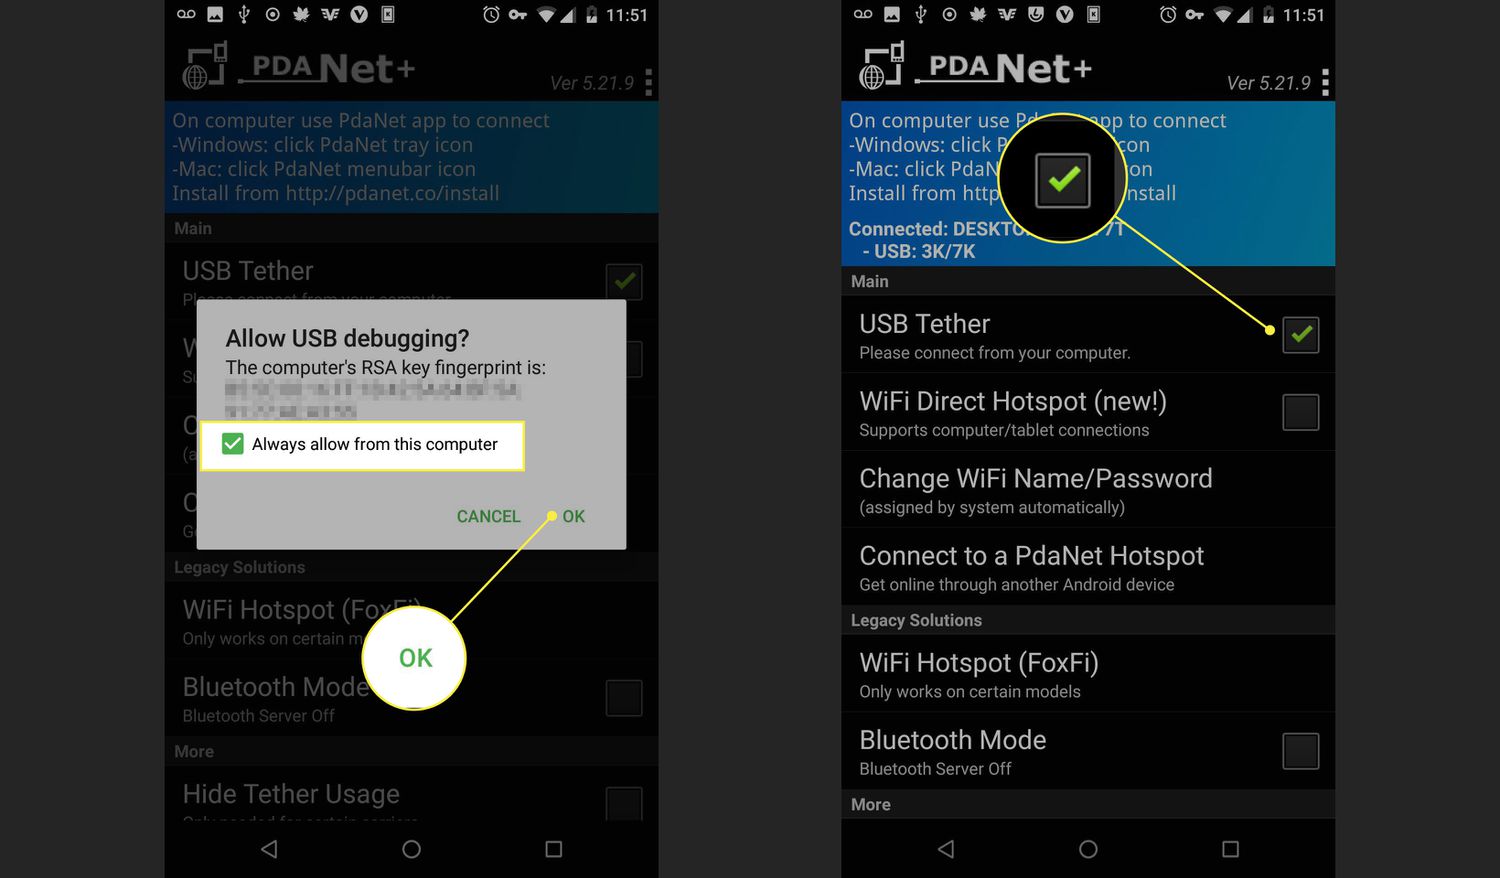
PdaNet establishes a connection between your iPhone and laptop, allowing you to make use of the cellular data on your iPhone to generate a reliable internet connection on your laptop. This can be done via USB tethering or by using your iPhone as a Wi-Fi hotspot tethering device.
What Are The Advantages Of Connecting Your Device To The Pdanet Network?
Tethering with PdaNet provides internet connectivity that is both dependable and fast, allowing users to circumvent the constraints that are inherent to conventional Wi-Fi networks.
Which Operating Systems Are Compatible With The Pdanet Application?
PdaNet's accessibility is ensured by its compatibility with both the Windows and macOS operating systems, making it usable by a broad spectrum of laptop owners.
Conclusion
The ability to tether your laptop with an iphone and pdanet provides a vital lifeline for maintaining ongoing work and communication in a world that is heavily dependent on internet connectivity.
PdaNet provides a smooth bridge between the cellular data connection that your iPhone has and the need for online access that your laptop has. With its user-friendly setup, advanced capabilities, and devotion to security, PdaNet does this by connecting your iPhone to your laptop.
PdaNet gives you the ability to maintain an internet connection wherever your travels may take you, regardless of whether you select the convenience of tethering by USB or the flexibility of tethering via a Wi-Fi hotspot. PdaNet will allow you to embrace the world of tethering and feel the freedom of continuous connectivity without interruptions.

Daniel Barrett
Author
Daniel Barrett is a tech writer focusing on IoT, gadgets, software, and cryptocurrencies. With a keen interest in emerging technologies, Daniel offers expert analysis and commentary on industry trends. Follow him for authoritative insights into the latest tech innovations.
Latest Articles
Popular Articles