8 Easy Ways To Boot Into Safe Mode On Windows 10
In this article, we discuss how to boot Windows 10 into safe mode. The safe mode makes it easy to troubleshoot problems. Learn more.
Author:Daniel BarrettMay 29, 20226.7K Shares397.7K Views
If you have used Windows 10 for a while, you might have noticed that pressing the F8 or the SHIFT + F8 keys on your keyboard to boot into Safe Mode no longer works. These methods stopped working because the Windows 10 start procedure became faster. However, that does not mean that Windows 10 has no Safe Mode. To get to it, you have to follow other procedures.
When you boot into Safe Mode in Windows 10, the operating systemloads a minimal user interface, with only the essential services and drivers needed for it to function. This mode makes it easy to troubleshoot problems because it does not load things that can make Windows crash.
Why Can’t You Access The Safe Mode Using F8?
On previous versions of Windows, such as Windows 7, at the beginning of the boot, you’re able to press the F8 key to access the Advanced Boot Options menu, where you can enable Safe Mode. But on Windows 10, the F8 key doesn’t work anymore. No matter how many times you’ve tried. You must be wondering why this happens. Is it removed from Windows 10?
The F8 key is still available to access the Advanced Boot Options menu on Windows 10. But starting from Windows 8 (F8 doesn’t work on Windows 8, either.), Microsoft has disabled this feature by default to have a faster boot time. That is to say, Windows 10 boots too fast to have any time to let anything interrupt. So if you want to use the F8 key to access the Safe Mode, you need to enable the feature manually.
How Can You Get F8 To Work Again?
F8 boot menu feature is disabled on Windows 10 by default. The good newsis you can get it to work again with the Boot Configuration Data (BCD) Edit command. BCD Edit is a tool written to control how the operating system is started. You can use it to enable the F8 boot menu easily. Just follow these steps:
- On your keyboard, press the Windows logo key and R key simultaneously to invoke the run command.
- Type “cmd” then press Ctrl+Shift+Enter to open an administrator command prompt. (Don’t just press Enter or click OK as that won’t open the command prompt in an administrator mode.)
- Please copy the following command and paste it into the Command Prompt. Then on your keyboard, press the Enter key.
- Reboot your PC. Before the Windows logo appears, press F8 to access the Boot Options menu (see below screenshot). Then select Safe Mode.
Note:You can get F8 to work again only when you can access Windows. If you can’t start Windows normally, you need to use another effective way.
If you want to know all the methods that you can use to start Windows 10 in Safe Mode, read this tutorial to the end.
Use “Shift + Restart” On The Windows 10 Sign In Screen.
If you cannot log into Windows 10, but you can get to the Sign In screen, press and hold the SHIFT key on the keyboard. With this key still pressed, click or tap the Power button and, in the menu that opens, click Restart.
- Windows 10 restarts and asks you to select an option. Choose “Troubleshoot.”
- On the Troubleshoot screen, go to Advanced options.
- On the Advanced options screen, choose “Startup Settings.” Depending on your Windows 10 computer, you may not see this option at first. If you do not, click or tap the link that says “See more recovery options.”
- Finally, click or tap the “Startup Settings” option.
- Windows 10 says that you can restart your device to change advanced boot options, including enabling Safe Mode. Press “Restart.”
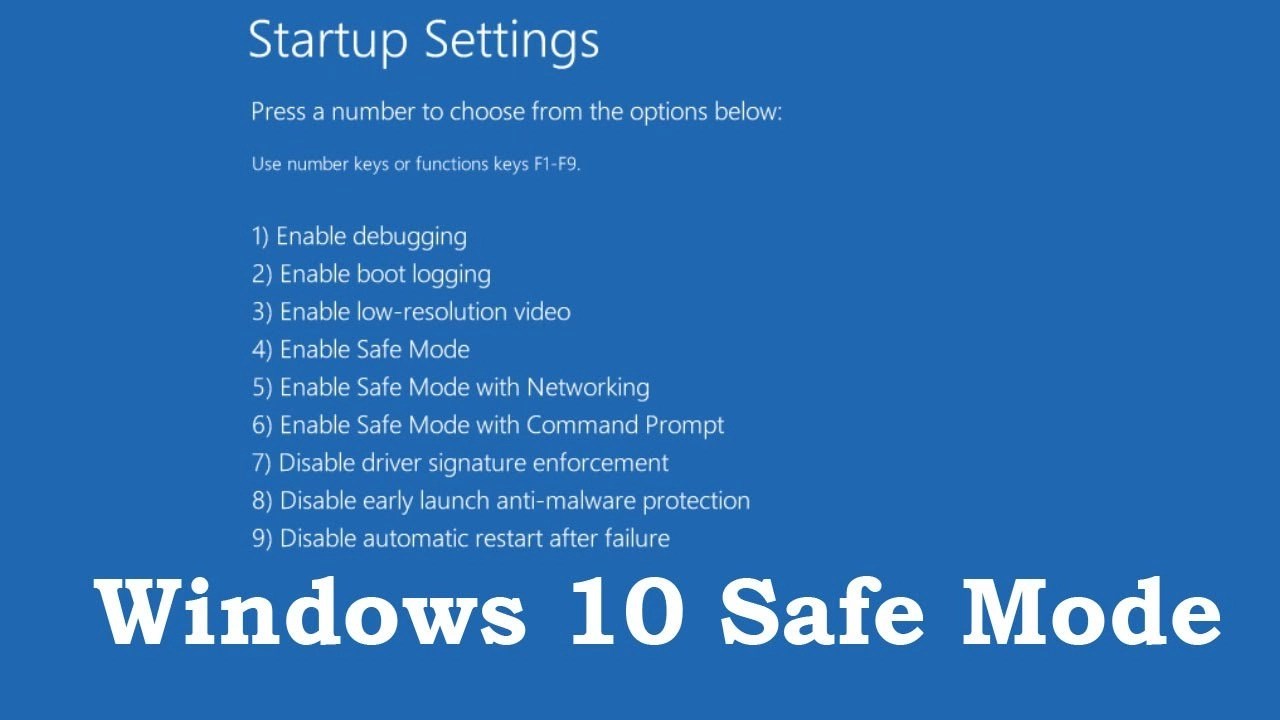
After Windows 10 restarts one more time, you can choose which boot options you want to be enabled. For example, to get into Safe Mode, you have three different options:
- Standard Safe Mode – press the 4 or the F4 key on your keyboard to start it.
- Safe Mode with Networking – press 5 or F5.
- Safe Mode with Command Prompt – press either 6 or F6.
Log into Windows 10 Safe Mode with a user account with administrator permissions, and perform the changes you want.
Use The Settings App To Access The Recovery Options And Start Safe Mode
If you can log in to Windows 10, another way to boot into Safe Mode is from the Settings app. Open Settings (Windows + I) and head to the Update & security section.
On the left side of the Settings window, press “Recovery.” On the right side of the app, in the Advanced startup section, click or tap the “Restart now” button.
After Windows 10 restarts, choose the “Troubleshoot” option.
Then, you have to follow the same steps as those we have shown in the previous method from this guide. In short, you must go to “Advanced options -> Startup Settings -> Restart.” Then, press 4 or F4 on your keyboard to start in Safe Mode, press 5 or F5 to boot into “Safe Mode with Networking,” or press 6 or F6 to go into “Safe Mode with Command Prompt.”
Boot From A Windows 10 Flash USB Recovery Drive
In Windows 10, you can create a system recovery USB drive. Since your PC may not be working, create this USB recovery drive on another computer with Windows 10.
Once you have created a USB recovery drive, use it to boot your Windows 10 PC or device and, when you are asked to load its content, do so. The first screen asks you to choose the layout for the keyboard. Select the one you want to use, or if you do not see it listed, click or tap “See more keyboard layouts” to get the complete list of available layouts.
After choosing the keyboard layout you want to use, on the “Choose an option” screen, go to “Troubleshoot.”
The next steps you need to take to boot into Safe Mode are the same ones we showed in the first and second methods from this guide, which is to follow this path: “Advanced options -> Startup Settings -> Restart.” Then, press the 4 or the F4 key on your keyboard to boot into minimal Safe Mode, press 5 or F5 to boot into “Safe Mode with Networking,” or press 6 or F6 to go into “Safe Mode with Command Prompt.”
Interrupt The Normal Boot Process Of Windows 10 Three Times In A Row
If Windows 10 fails to boot normally three times over, the fourth time, it enters by default in an Automatic Repair mode. Using this mode, you can boot into Safe Mode. To trigger the Automatic Repair mode, you must interrupt the normal boot process three consecutive times: use the Reset or the Power button on your Windows 10 PC to stop it during boot before it finishes loading Windows 10. If you use the Power button, you might have to keep it pressed for at least 4 seconds to force the power off. When Windows 10 enters the Automatic Repair mode, you see a screen that tells you that the operating system is “Preparing Automatic Repair.”
Then, you may be asked to choose an account to continue. First, choose an account with administrator permissions, and type its password. If you are not asked for this information, skip to the next step.
- Wait for Windows 10 to try to make an automatic diagnosis of your PC.
- On the “Automatic Repair” screen, press the “Advanced options” button.
- Then, choose “Troubleshoot.”
From here on, the steps you have to take are the same as those we have shown in the first method from this guide. Follow the path “Advanced options -> Startup Settings -> Restart.” Then, press the 4 or the F4 key on your keyboard to boot into minimal Safe Mode, press 5 or F5 to boot into “Safe Mode with Networking,” or press 6 or F6 to go into “Safe Mode with Command Prompt.”
Use A Windows 10 Installation Drive And The Command Prompt
If you have a Windows 10 setup DVD or USB memory stick lying around, or if you can create one right now, use it to boot your broken PC with Windows 10 into Safe Mode and wait for the installation environment to load. Choose the language and keyboard layout you prefer and click or tap “Next.”
- Click or tap on the link that says “Repair your computer” on the bottom left corner of the screen.
- When asked what option you prefer, choose “Troubleshoot.”
- On the “Advanced options” screen, click or tap “Command Prompt (Use the Command Prompt for advanced troubleshooting).”
- Inside the Command Prompt window, type the command: bcdedit /set {default} safeboot minimal. Press Enter on your keyboard, and, after a moment, it tells you that “The operation completed successfully.”
- Close the Command Prompt and choose to Continue on the next screen.
- After your PC reboots, Windows 10 starts into Safe Mode. Log in with a user account with administrator permissions, and perform the changes you want.
Important note:The problem with this method is that it tells Windows 10 to enter Safe Mode automatically every time you start it until you tell it not to. To disable this setting, and get Windows 10 to boot normally again, run the same procedure one more time and type the command: bcdedit /deletevalue {default} safeboot.
Use “Shift + Restart” On The Windows 10 Start Menu.
Another way of getting into Safe Mode in Windows 10 is to use the options found on the Start Menu. First, press and hold the SHIFT key on the keyboard. Then, with that key still pressed, click the Start button, then Power, followed by Restart.
Windows 10 reboots and asks you to select an option. Choose “Troubleshoot.”
Next, you have to follow the same steps as those shown in some of the previous methods from this guide. In short, go to “Advanced options -> Startup Settings -> Restart.” Then, press 4 or F4 on your keyboard to start in Safe Mode, press 5 or F5 to boot into “Safe Mode with Networking,” or press 6 or F6 to go into “Safe Mode with Command Prompt.”
Use The System Configuration Tool (msconfig.exe) To Enable Safe Mode
If you can log in to Windows 10, one of the easiest methods to boot into Safe Mode is to use the System Configuration tool. Many users know this tool by its file name: msconfig.exe.
In the search field from the taskbar, enter the words “system configuration.” Then click or tap the System Configuration shortcut. Other ways to start this tool are described here: 8 ways to start System Configuration in Windows (all versions).
Click or tap the “Boot tab” in the System Configuration window. Next, select the “Safe boot” option in the Boot options section. Finally, click or tap OK.
Windows 10 tells you that you need to restart your computer for the new setting to take effect. If you still have work to do, you can select “Exit without restart.“ If not, you can restart now, and your device automatically boots into Safe Mode.
After Windows 10 reboots, it goes straight into Safe Mode.
Use F8 Or Shift + F8 (Does Not Work When Using UEFI BIOS And SSD Drives)
In Windows 7, you could press F8 just before Windows got loaded to open the Advanced Boot Options window, where you could choose to start Windows 7 into Safe Mode. Likewise, some websites advise you to press Shift+F8 just before Windows 10 starts loading to make it launch the recovery mode, from where you can boot into Safe Mode. The problem is that most times, Shift+F8 and F8 do not work, even though they are correct commands supported by Windows 10.
This official blog post from Microsoft explains that this behavior is caused by their work in creating a fast boot procedure. Both Windows 8.1 and Windows 10 have the fastest boot times ever. To quote Steve Sinofsky:
“Windows 8 has a problem – it really can boot up too quickly. So quickly that there is no longer time for anything to interrupt boot. When you turn on a Windows 8 PC, there’s no longer long enough to detect keystrokes like F2 or F8, much less time to read a message such as “Press F2 for Setup.” For the first time in decades, you will no longer be able to interrupt boot and tell your PC to do anything different than what it was already expecting to do.”
If you have a modern PC with a UEFI BIOS and a fast SSD drive, there is no way you can interrupt the boot procedure with your keypresses. However, pressing these keys might still work on older PCs with a classic BIOS and no SSD drive.
Windows 10 is a fast operating system with a fast boot process. Getting into Safe Mode might not work the way it did in older Windows operating systems, but the methods available are similar to the ones in Windows 8.1. Try some of the methods we shared, and let us know which ones worked and which you prefer most. Comment below, and let’s discuss.
Editor’s picks:
Jump to
Why Can’t You Access The Safe Mode Using F8?
How Can You Get F8 To Work Again?
Use “Shift + Restart” On The Windows 10 Sign In Screen.
Use The Settings App To Access The Recovery Options And Start Safe Mode
Boot From A Windows 10 Flash USB Recovery Drive
Interrupt The Normal Boot Process Of Windows 10 Three Times In A Row
Use A Windows 10 Installation Drive And The Command Prompt
Use “Shift + Restart” On The Windows 10 Start Menu.
Use The System Configuration Tool (msconfig.exe) To Enable Safe Mode
Use F8 Or Shift + F8 (Does Not Work When Using UEFI BIOS And SSD Drives)

Daniel Barrett
Author
Daniel Barrett is a tech writer focusing on IoT, gadgets, software, and cryptocurrencies. With a keen interest in emerging technologies, Daniel offers expert analysis and commentary on industry trends. Follow him for authoritative insights into the latest tech innovations.
Latest Articles
Popular Articles