How To Downgrade macOS Sierra Back to El Capitan
Want to downgrade from macOS Sierra to El Capitan? This article will help you downgrade from any version of the Mac operating system to an older version
Author:Daniel BarrettMay 30, 202222.9K Shares740.9K Views

You could have upgraded to macOS Sierra from El Capitan and you notice that your Mac is not running as expected. Your email may not work, apps may not respond or your battery may drain fast. This calls for downgrading to El Capitan (OS X 10.11). This might be difficult, especially if you don’t know how to revert macOS Sierra back to El Capitan. You don’t have to fret, this article show how to do it.
There are three key aspects when you are considering a downgrade from macOS Sierra to El Capitan. These are as follows:
- First You will have to Erase the macOS Sierra from your Mac
- Next you will have to Re-install El Capitan
- Check that your System is stable
- Please make sure that you backup your MacBook before proceeding with the downgrade.
For the vast majority of Mac users, macOS Sierra is a nice upgrade that goes without a hitch. For a small number of users, macOS Sierra presents a unique variety of problems that are impervious to all troubleshooting attempts, even reinstalling Sierra or a clean install. If you fall into the latter camp, or just decide that macOS Sierra just isn’t working out for you, you can downgrade from macOS Sierra to OS X El Capitan.
Usually this process is pretty easy and safe if you had chosen a second partition for using the beta install. It is always a good idea to do so if you are trying to install a beta edition of the OS X.
This article will help you downgrade from any version of the Mac operating systemto an older version – so if you are looking to downgrade from Big Sur, Catalina, Mojave, High Sierra, Sierra, El Capitan or even one of the Big Cat versions of Mac OS X, then read on!
For the sake of this article, we’ll be downgrading from macOS Sierra to El Capitan.
Backup your Mac first!
Before you start the process of downgrading your Mac, you should back up your Mac. The reason for making a back up is that during the downgrade process you will completely wipe your hard drive – so if there is anything you don’t want to lose make sure you have a copy of it.
However, you shouldn’t use Apple’s Time Machine to make this particular backup, because if you recover from a Time Machine backup made in macOS Big Sur you will recover Big Sur too. Instead back up any recent changes and documents using another back up tool.
How to Downgrade Sierra to El Capitan
Before you downgrade to El Capitan you should ensure that
- You have backed up any data that you added on macOS Sierra on a hard drive.
- Do not backup with Time Machine.
- Do not launch El Capitan installer on macOS Sierra since it will opt for the latest version which macOS sierra. Therefore you have to erase macOS Sierra before running El Capitan.
- You are connected to Wi-Fi or Ethernet.
You can now follow these steps where you will have to erase macOS Sierra and then Reinstall El Capitan.
Step 1. Erase macOS Sierra
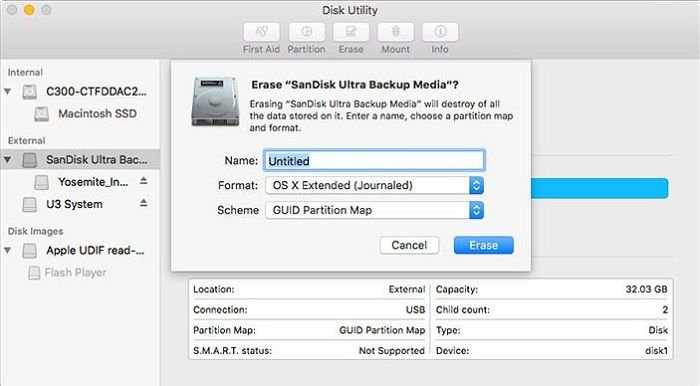
- Select the item of “Restart” from the “Apple” menu of your Mac .
- Now click on “Command + R” until your Mac restarts.
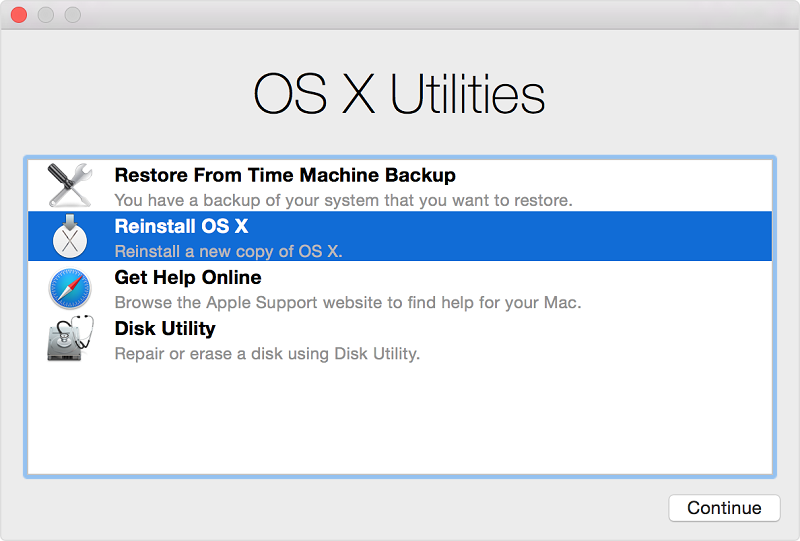
- Coming with OS X Utilities Window, choose “Disk Utility” and then select “Continue”.
- Click “Erase” button after entering the “Startup Disk” item .
- Now you have to name the file that to be erased and then choose “Mac OS Extended (Journaled)” format. After that click on “Erase”. From there you can now quit the Disk Utility and get to OS X Utilities again.
Step 2. Get OS X El Capitan Reinstalled
- Select “Reinstall OS” option from OS X Utilities Window.
- Reinstall El Capitan installer by clicking on “Continue”.
- Comply with the terms and conditions to reinstall it on your Mac.
- Upon completion, your Mac will reboot. From there you can now restore your backup from Time Machine to your Mac.

Daniel Barrett
Author
Daniel Barrett is a tech writer focusing on IoT, gadgets, software, and cryptocurrencies. With a keen interest in emerging technologies, Daniel offers expert analysis and commentary on industry trends. Follow him for authoritative insights into the latest tech innovations.
Latest Articles
Popular Articles