What Motherboard Do I Have? 4 Ways To Find Out
In this guide, we will explain to you how to check your PC’s motherboard and also highlight four different ways to check the motherboard.
Author:Daniel BarrettAug 15, 20223K Shares303K Views
Curious to know your type of motherboard? You can do so without having to open the computer case. In this guide, we will explain to you how to check your PC’s motherboard and also highlight four different ways to check the motherboard.
The steps aren’t common knowledge so we’ll break them down for your easy understanding.
Types of Motherboards
Motherboards are classified based on their form factor i.e shape and size and the kind of techthat is on the motherboard.
AT:This is the original motherboard used in computers up until Pentium 2. It is 13.8 x 12 inches with 6-pin plugs and sockets for power. In 1985, a smaller form factor of this board was introduced. It was called “Baby AT”. The AT is outdated presently.
Advanced Technology Extended (ATX):In 1995, Intel introduced the ATX. With a size of 12 x 9.6 inches with 4-pin plugs and sockets for peripheral power.
ITX:In 2001, VIA Technologies introduced the Mini-ITX, a much smaller (6.7×6.7 inches) motherboard made for compatibility with ATX cases. They followed this up with Nano-ITX (4.7 x 4.7 inches) in 2003 and the Pico-ITX (3.9 x 2.8 inches) in 2007.
What You Can Find Out About Your Motherboard
Considering changing your expansion cards or adding more memory? These are some things you should know first.
This information includes:
- Serial Number
- Product
- Version
- Manufacturer
Ways to Find Out Your Type of Motherboard
There are a few ways you can check. Here are some:
1. Using System Information
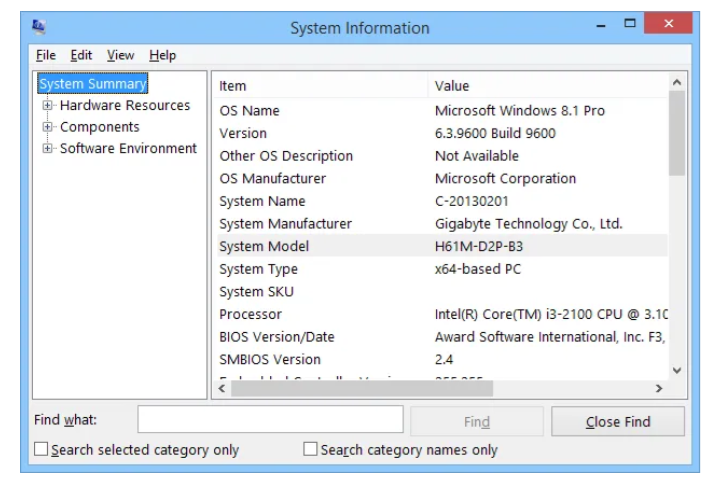
Follow these steps:
- Go to the Start menu and input “System information”
- Next, go to the “System Summary” section and look for “System Model” on the main page
- On the page that opens, your motherboard’s information is displayed.
2. Using Command Prompt
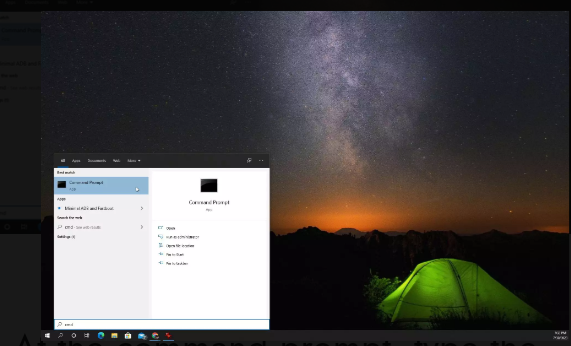
You can get access to all of the same information plus the serial number by using a “wmic” (Windows Management Instrumentation Commandline) command in the Windows command prompt.
- Select the Start menu and type cmd. Select the Command Prompt app.
- At the command prompt, type the following command and press Enter on the keyboard:
- Press enter and the information about your motherboard would be displayed
3. Using Third-Party Apps
A few software programs can be used to access the motherboard’s information. A common and easy-to-use one is the CPU-Z.
3.1 How To Use CPU-Z
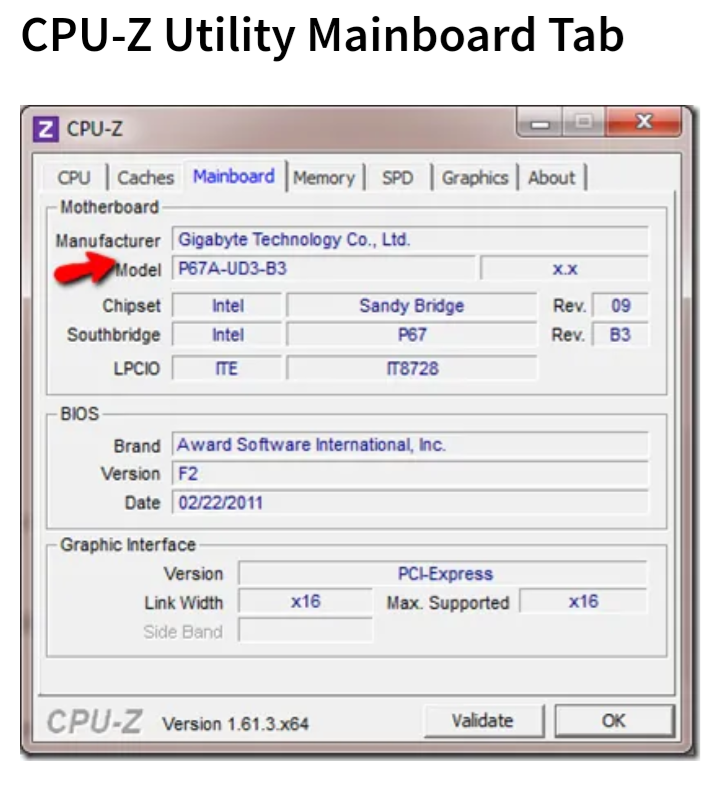
- Download the CPU-Z app from their website and install it
- Launch the app after installation
- After launching, it would be on default on the CPU tab and display information about your system processor.
- Go to the Mainboard tab to check information about the motherboard.
One thing peculiar to CPU-Z is that it shows additional information like the chipset type, BIOS and graphics card slot.
3.2 Using Belarc Advisor
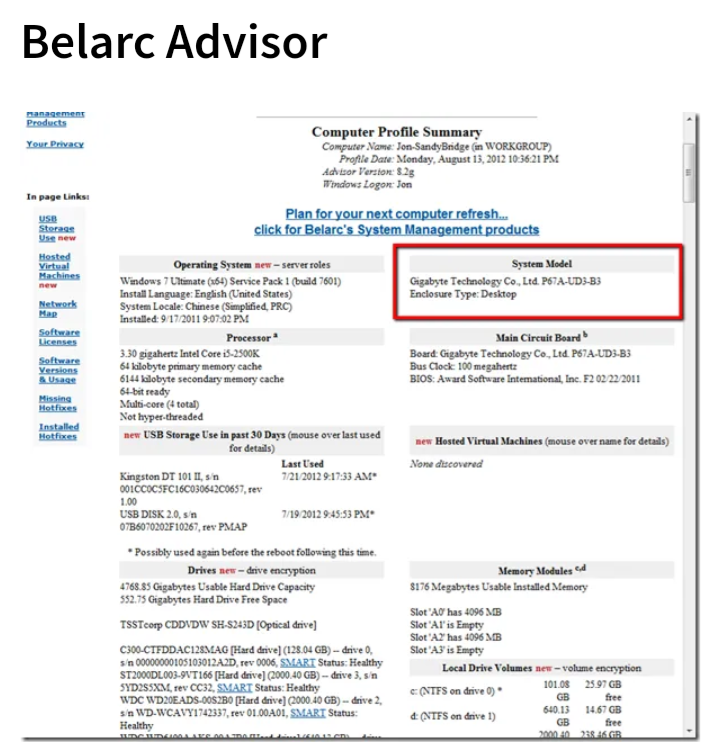
Belarc Advisor is another freeware you can download and run the system scan.
- Download and launch the app
- It would generate a web page when it is done scanning your PC.
- On the web page generated, you can find a lot more information there.
- Information like all the USB storage that your computer was connected to in the last 30 days.
4. Resorting to Opening the Case

When all of the above methods fail for one reason or the other, you can resort to opening your case to see the details of your motherboard. Sometimes you’ll find the motherboard info written along the very edge of one of the sides of the motherboard, or in the very center near the CPU. Information printed there may also include the chipset, model, and serial number.
Editor’s picks:

Daniel Barrett
Author
Daniel Barrett is a tech writer focusing on IoT, gadgets, software, and cryptocurrencies. With a keen interest in emerging technologies, Daniel offers expert analysis and commentary on industry trends. Follow him for authoritative insights into the latest tech innovations.
Latest Articles
Popular Articles