How to Resize Photos in Windows 10 Using Images App
This article explains how to use the Windows 10 photos app to resize images. Click the link to read the full guide.
Author:Daniel BarrettJul 31, 202224.9K Shares925.5K Views

Do you need to change the size of an image? Are you using Windows 10? Well, the good newsis that you actually can resize your images on Windows 10. This is simply possible with the help of the widely known “Paint” desktop software. You could also go for other apps such as Paint, Photos app, CorelDRAW or Snagit. This article explains how to use the Windows 10 photos app to resize images.
Use Paint to Resize Your Photos
Paint has been a staple of Windows since version 1.0 in 1985. Chances are you’ve used it before. Paint opens most common file types (BMP, PNG, JPG, TIFF, and GIF) and offers a very straightforward approach to resizing images.
- In Paint, open your image by opening up the File menu, and then clicking the “Open” command.
- Find and select the image you want to resize, and then click the “Open” button.
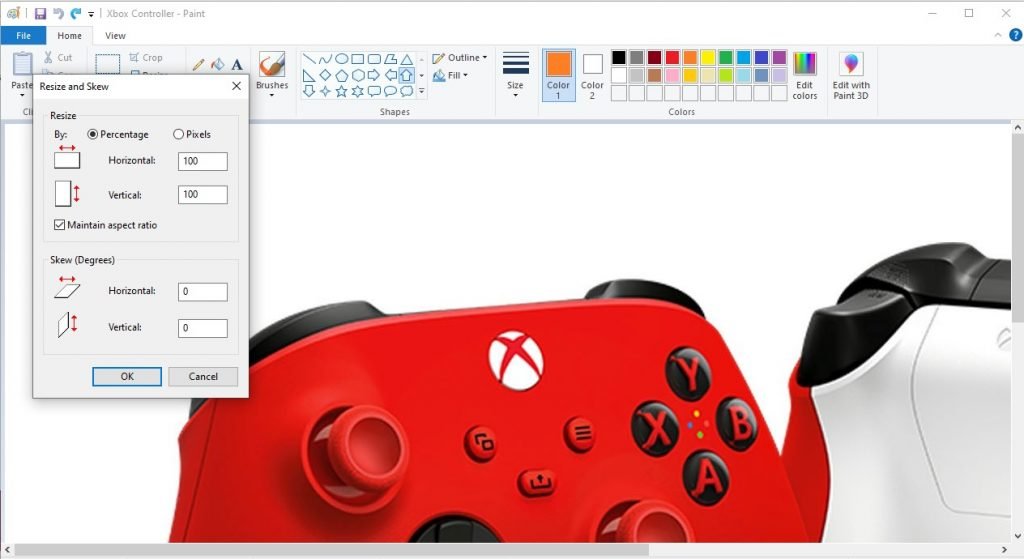
- On the Home tab of the Paint toolbar, click the “Resize” button.
Paint gives you the option of resizing by percentage or by pixels. It uses percentage by default, and that’s fine for rough resizing. If you need something specific, you’ll need to switch over to using pixels. When you type a horizontal or vertical value, Paint automatically creates the other value for you to maintain the original image’s dimensions. Select the percentage you want, or the desired dimensions, and then click the “OK” button.
Note:As of 2017, Paint has been added to the deprecated list of apps no longer being developed by Microsoft. Instead, they are replacing Paint with Paint 3D. Paint is likely not going away for a while, though, and you’ll still be able to download it from the Windows Store.
Don’t miss: How To Reset A Forgotten Windows 10 Password
Resizing Images Using Windows 10 Photos App
To resize an image, open the Photos app and select the image from your library that you want to resize. Or, you can open File Explorer and right-click the image you want and choose Photos from the “Open with” option. Once the image is shown in Photos, click the “. . .” option on the Top-Right of the screen — also known as See More and then pick the Resize option form the menu.
Another menu will open with three different options for resizing your image. The sizing options include Small (0.25 MP) for profile pics and thumbnails, Medium (2MP) for emails, and Large (4 MP) for viewing. You will also see the original MP (megapixel) size of the image, so you have an orientation point. Choose the size you want and then where you want the resized image saved.
Also read: How To Disable Cortana In Windows 10
Third-Party Apps
There are various third-party apps that could be used in resizing an image such as Snagit, PicPick, jumbo paint etc. in this article, we would explain how to use the PicPick app as it is one of the most highly rated and used app for resizing images. Fear not, for other apps are quite straightforward and easy to use.
Using PicPick To Resize Photos (Third Party App)
PicPick has a similar-looking interface to Paint, though it packs a lot more features under the hood, including better editing and annotation tools, and solid screen capture utility. It’s free for personal use and the commercial use license costs about $25 .
- On the PicPick splash screen, click the “Open an existing image” link, and then find the image you want to resize. You can also drag an image from File Explorer onto an open PicPick window.
- On the toolbar, click the “Resize” button, and then click “Image Resize” on the dropdown menu.
- PicPick provides the option of using percentage or pixels to resize. It uses percentage by default, which is good for rough resizing. If you need to resize to precise dimensions, switch over to using pixels.
- When you type a width or height value, PicPick automatically sets the other value for you to maintain the original image’s dimensions. You can disable this by deselecting the “Keep aspect ratio” check box, though it is not advised.
- Select the percentage you want, or the desired dimensions, and then click the “OK” button.
You should be informed that the resizing options will differ depending on the original size of the image. For example, if you have a photo that is already large, some of the resizing options will be grayed out.
And if you have an image that’s too small, the resize option won’t even be available. The quality of a resized image really depends on the original image you’re resizing.
Bottom Line
Photographs tend to do best, at least when you’re reducing the size of an image, because they have lots of detail to begin with. High resolution photos are more open to blowing up to larger sizes, but even they have their limits—blow up a photograph too much and things start to get grainy
Currently, the resizing options in the Photos app are basic and it doesn’t offer a whole lot of choice. If you need to resize images to a specific size for a work or school project, it’s usually best to go with a more powerful third-party app such as SnagIt or Paint.net. But for quick and basic resizing the Photos app gets the job done.
Editor’s picks:

Daniel Barrett
Author
Daniel Barrett is a tech writer focusing on IoT, gadgets, software, and cryptocurrencies. With a keen interest in emerging technologies, Daniel offers expert analysis and commentary on industry trends. Follow him for authoritative insights into the latest tech innovations.
Latest Articles
Popular Articles
