How to Download and Easily Use MSI Afterburner
Download MSI Afterburner - MSI Afterburner is every gamer’s dream. It is a graphics-based utility that can help you take control of your graphics card.
Author:Daniel BarrettAug 20, 202244145 Shares774481 Views
MSI Afterburner – Almost every gamer loves to rev up the computer to perform at its best. Who doesn’t love smooth displays and a system that’s churning enough power to make your gameplay hit the next mile? Luckily, we have the MSI Afterburner utility. But, how to use MSI Afterburner?
MSI’s Afterburner is every gamer’s dream. It is a graphics-based utility that can help you take control of your graphics card. From overclocking to basic monitoring, it’s capable of taking care of everything when it comes to your gamingexperience.
What Does MSI Afterburner Do?
As it is clear from the introduction that MSI burner is one of the best graphic card utilities for overclocking, which helps users to make the most of their chipset. However, apart from overclocking, there are several other things that Afterburner is capable of doing so.
It gives complete control over the graphics card. It is responsible for monitoring, benchmarking, customizing fan profiles, troubleshooting, and much more (keep reading to know more about the features).
How to Download MSI Afterburner
Downloading and installing MSI Afterburner is a pretty simple process and one you’ve probably done a hundred times before. But for those that are new to the installing game – here is how it’s done:
- Type in Google “MSI Afterburner Download” and hit search
- Find MSI’s official Page and follow the link
- It should take you to the official MSI Afterburner page, once on that page scroll to the bottom and you will see a download link.
- Click the “MSI Afterburner” download link and download the installer
- Once downloaded, run the installer and let both Afterburner and Rivatuner install
- Restart your computer and load MSI Afterburner to start using the software.
Initial Settings For MSI Afterburner
Once you have downloaded and installed the MSI Afterburner, the story doesn’t end there. There are some initial configurations that have to be done to make your Afterburner up and working just like it should.
Follow the following steps to set up your MSI Afterburner:
- Run the MSI Afterburner
- Once it opens up, navigate to the cogwheel “Settings” button and click it.
- Now, look for the “User Interface” tab and click “Default MSI Burner skin” to change the skin as it gives a more uncluttered interface that will help you use the utility easily. Furthermore, other skins are prone to remove sliders randomly, making them inaccessible while tweaking.
- Now go to the “General tab” and click “Unlock voltage control” and “Unlock voltage monitoring.”
- In case you are using multiple GPUs, go to the “General” tab, and select the specific GPU that you want to monitor or overlock. You can find the GPU selection under the drop-down menu named” Master graphics processor selection.”
- From the settings options, you can configure the Afterburner according to your preferences. You can find startup features, compatibility options, AMD properties, and much more under the settings. However, many users find default settings much easier.
MSI Afterburner Monitoring
The on-screen display also makes use of the Rivatuner statistics server, which can be pre-programmed for several different uses. Keeping track of your GPU activity whilst gaming is a large part of benchmarking today, and the monitoring feature allows you to do this with live, on-screen updates.
Benchmarking
Benchmarking is hugely popular amongst product testers and enthusiasts alike today, especially now that there is so much competition surrounding the GPU industry. People want to know which card is best and what better way of showcasing that than in a fair, level playing field, benchmarking test.
MSI Afterburner includes a benchmarking tool called MSI Kombustor which runs a series of stressful GPU processes to see how well your graphics card reacts to the pressure. It’s a great way to see whether or not your overclocking tweaks have made an impact on the performance of your GPU. We will go into exactly how to use the software further down.
Video Capture
There is a ton of video capturing methods out there, and you guessed it, Afterburner has its own unique capture software built right in. The application is named Predator and helps capture in-game footage, tutorials, benchmark results, and more. You can capture in a number of different formats, qualities, and frame rates.
So, if you’ve decided to overclock your GPU, you’re going to need to know how to use Kombustor. You need to understand how to use and read Kombustor because before we overclock our card, we need to know what performance we are currently getting at base levels.
How to Use MSI Kombustor
The following short guide is going to walk you through how to do this.
- Open up Kombustor in MSI Afterburner
- Near the top, in the center, you should see three buttons. One should be the letter “K”
- The “K” stands for Kombustor and should be highlighted as the others are. If it isn’t highlighted and can not be clicked, you need to head over to the MSI Afterburner website and download the Kombustor app.
- Click the “K” Icon which should be located above the ‘core voltage’ meter
- MSI Kombustor should load up right away and begin stress testing your card.
- You can now monitor your GPU temp, FPS, GPU load, and more. This will give you an idea of how your graphics card performs at base levels.
- Once the test is complete, or before you close it off, record your performance scores so you can compare them with the performance-enhanced, overclocked settings.
At this stage, you’re going to want to start your overclocking process. We would recommend researching what other users have achieved when overclocking the same card as you to make sure you are pushing yours to the limit.
How to Use Overclocking Feature
The first thing you need to realize when thinking about overclocking any hardwarecomponents is that overclocking is not risk-free by any means. You are running a serious risk of permanent damage when overclocking so don’t be foolish when entering this process.
If at any stage you feel something is wrong or doesn’t feel right, stop immediately, and seek advice from more knowledgeable sources before continuing.
When overclocking in MSI afterburner, remember to follow the tried and tested routine of – trying and testing. Make a small change; check the results. Make another small change; check the results. You get the gist.
Anyway, with that, let’s jump in:
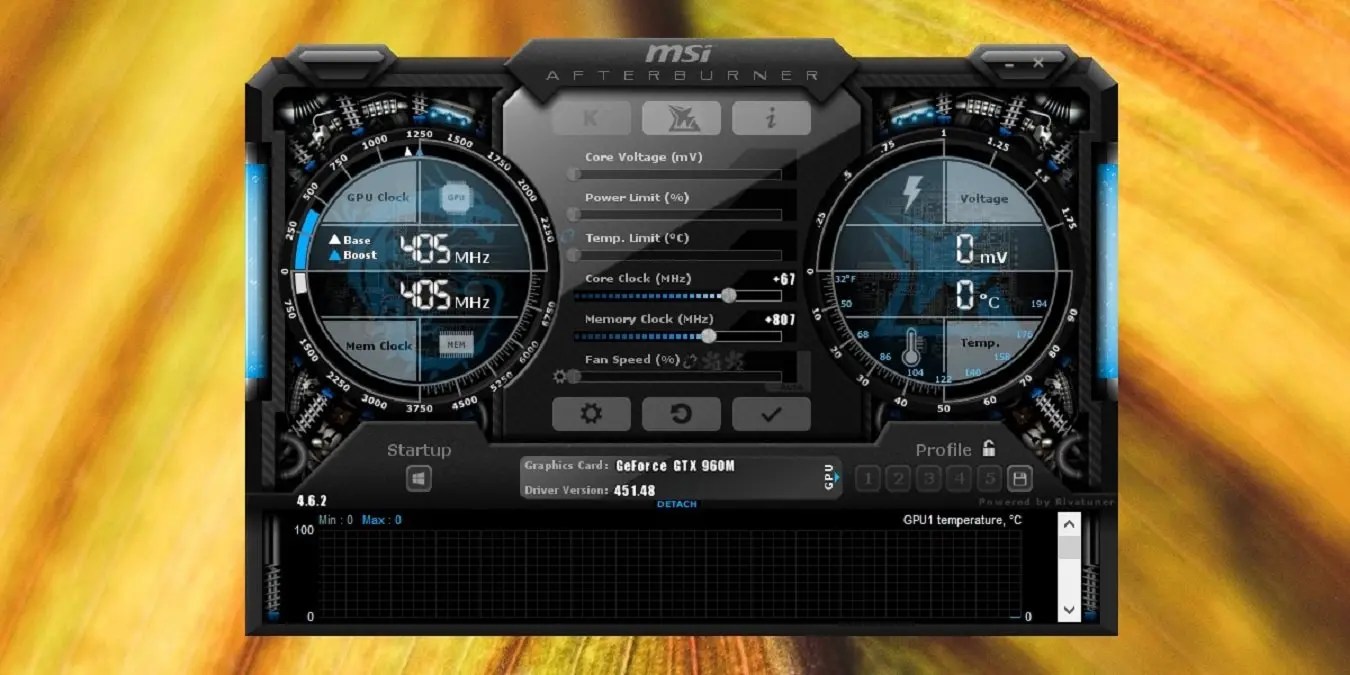
The first thing you will need to do is set both the ‘Power Limit’ and the ‘Temp Limit’ sliders to the maximum. With these boosted settings, the GPU will now be more power-efficient and should reach higher temperatures than it would at base. Worth noting – the GPU will never reach the upper limits unless there’s a hardware malfunction so don’t be shocked if the max temp seems ridiculously high.
MSI Afterburner Power Limit
Next, increase the core clock speed slider by small steps, i.e., 20-30Mhz per step. Each unit on the slider references a single MHz. If you push the slider in the positive position by 40, you are theoretically overclocking your core clock speed by 40Mhz. We highly recommend boosting your clock speed by 20-30Mhz each time and no more to ensure no damage is caused in the process. Always remember to hit the apply button after each incremental step.
Another tip is always to have Kombustor running in the background. This allows you to monitor how your GPU is handling the overclocked settings and you can pick up when your GPU is starting to crash under the strain. Any flickers, blackouts, glitches, or crashes usually mean that the GPU is no longer stable at its current settings and will need reverting back to factory or the last known stable settings.
After a while, depending on which card you have, you will start to see a steady flow of graphical issues, and your card won’t be able to maintain a stable playing field. At this point, you know you have reached the limit of what your card can do. Don’t be shocked by this behavior; all graphics cards have their limits. If your GPU completely black screens or crashes, the card will reset the driver allowing you to reduce the clock speed.
Start by reducing the clock speed in increments of 5Mhz until all errors and glitches have dissipated. Kombustor should be stable and running perfectly when the settings are manageable. If Kombustor is stable, try running a game on high settings and stress the graphics card to see if it handles that scenario, if it does, you have successfully overclocked your GPU.
Next, is to overclock the memory clock speed, and the same method applies with slightly different incremental steps. We recommend increasing the memory clock speed by 50-100Mhz per step. Again, once you experience regular errors and glitches in Kombustor, reduce the memory clock speed in small increments of 10Mhz until you find stable settings.
At this stage, you really want to test the new settings for a prolonged period of time to make sure the card is stable. I would recommend running Kombustor for a minimum of 10 minutes and monitoring the card as it does so. Just make sure there are no glitches, mishaps, crashes, and so forth. If there is, reduce the clock speed down by 10 and re-do the test.
Once you feel happy with the settings and everything seems stable. Save the settings as a profile by click on the floppy disk icon and selecting one of the profile options.
Enabling On-screen Display
Using MSI Afterburner for on-screen display benchmarking is a great way of showcasing how good, or bad, your GPU actually is. You can easily set the software to display temp, workload, memory clock, clock speed, and everything else that comes with a GPU.
Without further ado, let’s dive into the process.
- Click on the settings tab and find the monitoring tab
- Under “Active hardware monitoring graphs” select the information you would like to display on-screen by clicking the desired fields and checking the “show in on-screen display” box. If you’re doing a benchmark, for example, you can showcase the FPS, core clock speed, memory clock speed, and temps.
- Whenever you load up a game, the OSD (On-screen display) will provide real-time details about your GPU’s performance.
- You can assign in-game hotkeys to toggle the OSD on and off which is ideal for everyday use.
Setting a Fan Profile
Setting a fan profile is something I haven’t made great use of over the years because the GPU just does its thing and the world keeps ticking over. However, when overclocking, I feel customizing the fan profile is an essential part of how efficient your GPU will ultimately run.
Anyway, I’m a bit of a control freak and love having complete control over every element of my PC. Here’s how to set your own fan profile.
- Click on the settings tab in MSI Afterburner and locate the “Fan” tab in the menu bar at the top.
- Tick the “Enable user-defined software automatic fan control” tab so that you can start to customize the fan profile.
- You will see a curve chart that has both “fan speed %” and “temperature” as values. You can alter the curve to meet your specific needs.
- Once you have designed your ideal fan profile, click apply and close the window. Your new fan setup will be in full effect.
The scenario will depend on what fan profile you decide to go for. I mean, you might want to go from 60% fan speed right up to 100% as soon as the GPU goes over 50 degrees. Overclocking a GPU will, for me, always require a little extra fan juice because you want the card to be as stable and cool as possible.
It’s a learning curve, so just play around and see what works best for you.
Compatibility
Finally, we have compatibility, we touched on this a little earlier, but we’ll go into more detail here.
MSI Afterburner is, for the most part, compatible with every GPU regardless of make, model, chipset manufacturer, or card manufacturer. If you have a GPU made within the last ten years, this thing will support it. This makes Afterburner the most versatile graphics tweaking tool out there. You can use Afterburner to tweak your Radeon Rx 570 or your Nvidia GeForce GTX 2080Ti; it really doesn’t matter what you’re running.
The cross-brand support which features in Afterburner is different from other overclocking utilities out there (EVGA precision X1 or AMDs Overdrive) which only cater to their specific cards. Afterburner is also completely free of charge and very intuitive, as you’ve seen.
For me, it’s the best GPU overclocking software out there, and I would highly recommend any beginner looking to boost their hardware to use this.
Editor’s picks:

Daniel Barrett
Author
Latest Articles
Popular Articles