How To Easily Stream On PlayStation 4
In this guide, we’ll be showing you how to stream on PlayStation 4 using a capture card and with the PS4’s built-in streaming capabilities...
Author:Daniel BarrettMay 29, 202227273 Shares514588 Views
In this guide, we’ll show you how to stream on PlayStation 4using a capture card and the PS4’s built-in streaming capabilities to broadcast your gameplay to Twitch, YouTube, Facebook, and more.
Streaming is more popular than ever, with creators rushing to share their experiences in Fortnite, PUBG, Overwatch, and more.
Although as impressive as PS4 streaming ability is, it’s not suited for those who want a full stream with commentary, interactions in chat, and overlays.
How To Stream On PlayStation 4
There are different methods to stream on PlayStation4. Read and follow the steps carefully, and you’ll easily learn how to stream on PlayStation 4.
Method 1: Use The PS4’s Broadcast Feature
With The PS4 and PS4 Pro “broadcast” feature built into the operating system, you can automatically start streaming your gameplay to Twitch and YouTube, all with a few clicks of your X button.
As you already know, Streaming requires computingresources. Unfortunately, evaluating the PS4, it is already operating on thin margins when rendering games, which could lead to a choppy stream.
Note that there are limited controls when it comes to the quality of your stream. If you crave better control over how you broadcast, check method two.
Follow the steps below to get set up your broadcast feature.
Step 1: Link your accounts
Though there are various services your PS4 can link with, only Twitch and YouTube work for live video streams.
- Click Settings from the home screen.
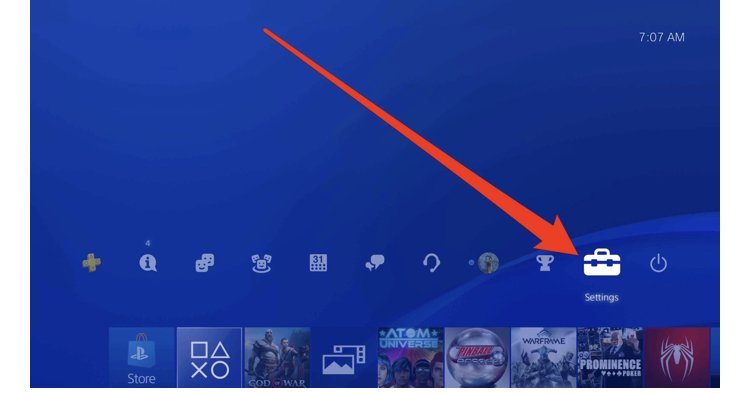
- Select Account management, then Link with other services.
- Select the service you want to use. We’ll be using Twitch for our example.
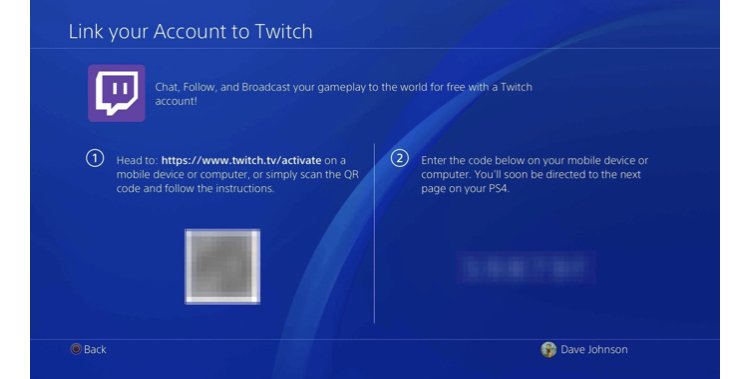
- Follow the instructions on-screen to link your account.
- With Twitch, you’ll need to either enter a code on your computer or scan a QR code with your phone to authenticate your account before you can start streaming.
Step 2: Adjust your video settings
What you need to do now is to launch a game. Once you do, you’ll have the privilege to open the “share” overlay by clicking the Share button on your controller. You can take a screenshot, share your gameplay with a friend, and more With this overlay.
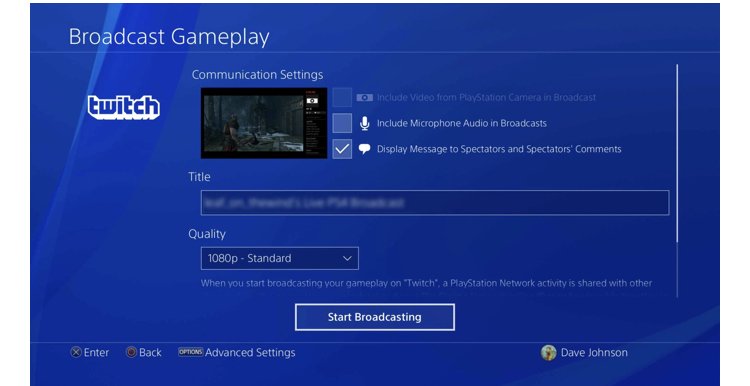
Before taking you live, the PS4 will inquire about your video stream settings and the platform you want to stream to. Give your stream a name, and choose if you want to broadcast your PlayStation Camera and microphone.
Click Start broadcasting, and you’ll be sent live.
Step 3: Start streaming
If you’re encountering issues in your live streaming, you can open the share overlay again to find the Broadcast gameplay button that has been replaced with a Broadcast settings button. There, you can make a change to your stream without going offline.
Method 2: Use A Capture Card (To Stream On Your Playstation 4)
Using a capture card is the preferred method of streaming on PS4. Although console streaming is more convenient, it’s also limited. As you can’t add overlays to your stream, webcams are supported but not in a customizable way, and you have limited control over your broadcast settings.
Once you Enter the capture card, these little devices take the data from your PS4 output to your TV and allow you to use it with your computer. Now that the video is being streamed to your OS, you can use third-party broadcast software, which will give you far more control over your stream.
Step 1: Plug Everything In
The goal is to plug your PS4 into the capture card and then send that video stream to your computer. The capture card works like a middle man, transmitting the information from your console to your computer.
There are a few different setups you can have, though. For example, if you only want to stream your gameplay, you’ll need to connect your PS4 to the capture card via HDMI, your capture card to a display via HDMI, and the capture card to your streaming computer over USB.
Connect your PS4 to your capture card and your capture card to your computer for commentary while playing. The Live Gamer Portable 2 Plus has a headphone and microphone connection built-in to capture your voice while you’re playing.
Step 2: Set Up Your Streaming Client
In this step, you’ll need a separate piece of software to stream when you’re using a capture card. Unfortunately, most capture cards come with streaming or editing software bundled in. You can try OBS, however. It’s open-source, easy to use, highly flexible, and, above all else, free.
You can set up multiple scenes, add transitions to them, and do picture-in-picture. We’ll show you how to get your PS4 running for this step. Before streaming, you’ll need to connect your accounts, which you can do following the steps below.
- Open OBS and click Settings.
- Select Stream.
- Choose your streaming service and connect your account.
OBS supports Twitch, YouTube, Facebook, and just about every other streaming platform. OBS requires a stream key, which you can find in your account on Twitch, and the like.
Under the Advanced tab, make sure you set your process priority to High or Above normal. That way, OBS will take more resources to send your stream. If you’re having a turbulent experience, close some background apps, that can help too.
Don’t Miss:Best Racing Games for PlayStation 4 in 2021
Next, you’ll need to set your encoder. OBS gives you the option between hardwareand software encoding. Hardware encoding depends on your CPU, while software encoding uses the power of your graphics card. The chosen one depends on the computer you’re using the stream.
Step 3: Setting Up Your Stream
Stream On PlayStation 4
Now, it’s time to set up your stream. First, add your capture card input as a source in OBS, which you can do by clicking the plus button under the Sources area.
There are different ways you can improve your overall streaming experience. First, try using other sources and scenes to enhance your enjoyment. OBS allows users to scale and move sources around the streaming window. With this, you can implement cool features such as overlays, webcams, and comment tickers in your stream. You can also use the Scenes section to sprinkle overlays into the starting portions of your stream and throughout your transitions.
Step 4: Start streaming
Click Start Streaming to officially go live. OBS is the most popular option among earnest streamers due to its flexible nature. Beginners may move toward OBS due to its comfortability.
You can also try out Streamlabs OBS, as it offers a variety of neat features, including a built-in chat, widget support, and free themes. Streamlabs OBS shares its source code with OBS but differs in its design in that it is specially made for streaming on Twitch and other similar streaming platforms. As a result, OBS will fit the bill for almost any of your streaming endeavors.
Editor’s picks:
- Best Racing Games for PlayStation 4 in 2021
- How To Easily Fix PlayStation 4 Won’t Turn On Issues
- Anthem For PlayStation 4 And Xbox One Review
Image Credit: BusinessInsider
Jump to
How To Stream On PlayStation 4
Method 1: Use The PS4’s Broadcast Feature
Step 1: Link your accounts
Step 2: Adjust your video settings
Step 3: Start streaming
Method 2: Use A Capture Card (To Stream On Your Playstation 4)
Step 1: Plug Everything In
Step 2: Set Up Your Streaming Client
Step 3: Setting Up Your Stream
Step 4: Start streaming

Daniel Barrett
Author
Latest Articles
Popular Articles