How To Reset Your IPhone When You Forgot Your Password Without Losing Data?
Today, we use so many different passwords for all of our accounts. It's easy to mix up iPhone passcodes and sometimes even forget them. It's not surprising that "How to reset forgotten iPhone passcode without losing data?" is one of the most-searched questions online. Well, to answer your question quickly, yes, there are ways to do it. This is what this piece will be mostly about. Let's find out more without further ado.
Author:Daniel BarrettAug 22, 20234338 Shares80327 Views
Today, we use so many different passwords for all of our accounts. It's easy to mix up iPhonepasscodes and sometimes even forget them. It's not surprising that "How to reset forgotten iPhone passcode without losing data?" is one of the most-searched questions online. Well, to answer your question quickly, yes, there are ways to do it. This is what this piece will be mostly about. Let's find out more without further ado.
Reset Your iPhone When You Forgot Your Passcode
When you forget your iPhone PIN, it can be stressful, but there are ways to get back in without losing your important information. In this piece, we looked at two good ways to change your iPhone PIN if you've lost it: using iTunes and iCloud's Find My iPhone tool.
With iTunes, you can use a previously synced computer to reset the password, while the Find My iPhone tool lets you erase the phone remotely and change the passcode. Before moving forward, it's important to think about what each method needs and what it can't do.
Always make sure to back up your iPhone so that you don't lose info in the future. With the information and steps in this article, you can easily deal with a lost iPhone password and take control of your device again without worrying that you'll lose important data.
Resetting your iPhone's PIN is a big job that needs careful thought and following the steps given. If you take the right steps, you can get back into your iPhone and keep using it without losing any important information.
How To Backup iPhone If You Forgot Password
You can't bring back a backup that was protected without its password. If you have iOS 11or later or iPadOS, you can change the password and make a new protected backup of your device.
If You Can’t Remember The Password For Your Encrypted Backup
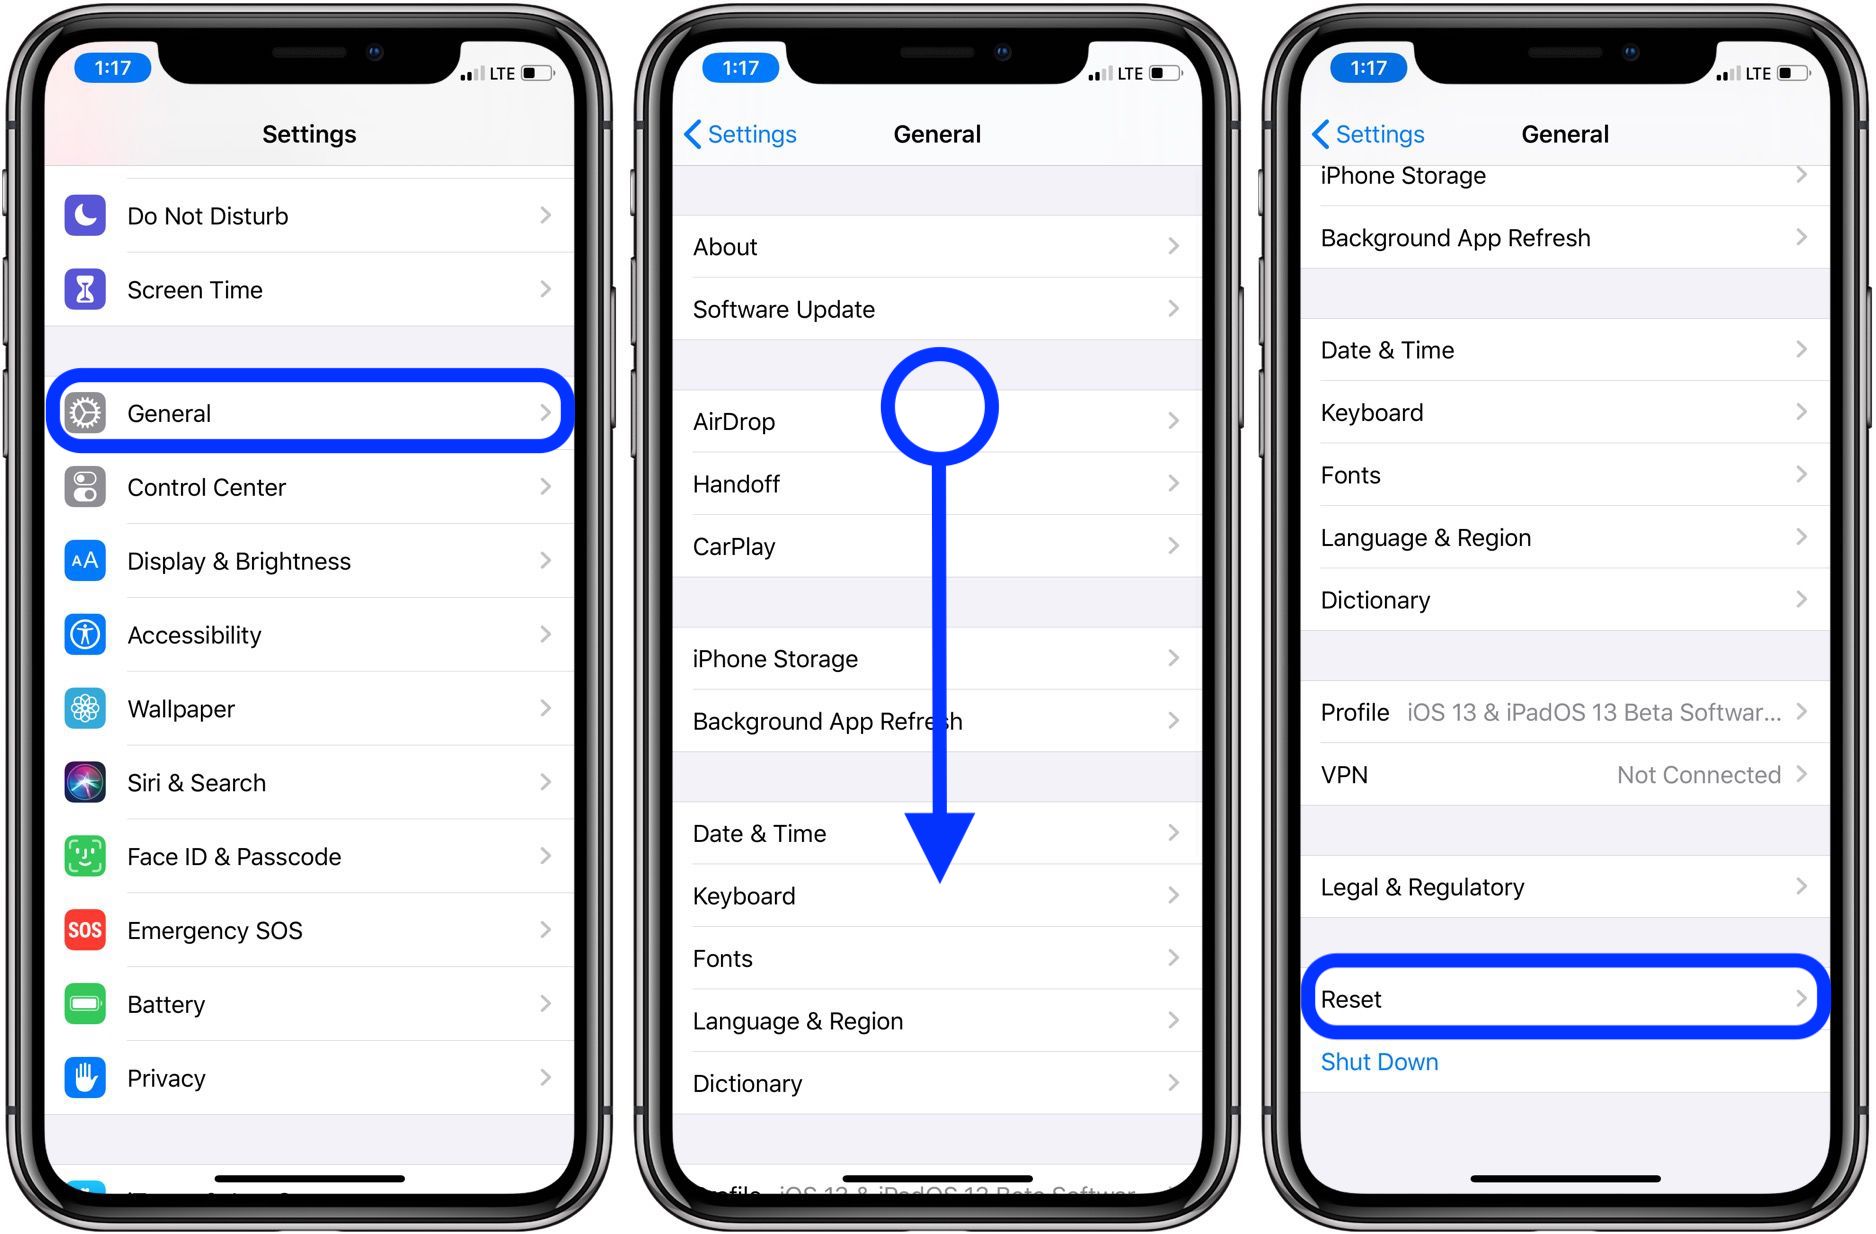
- Go to Settings > General > Transfer or Reset [Device], and then tap "Reset" on your device.
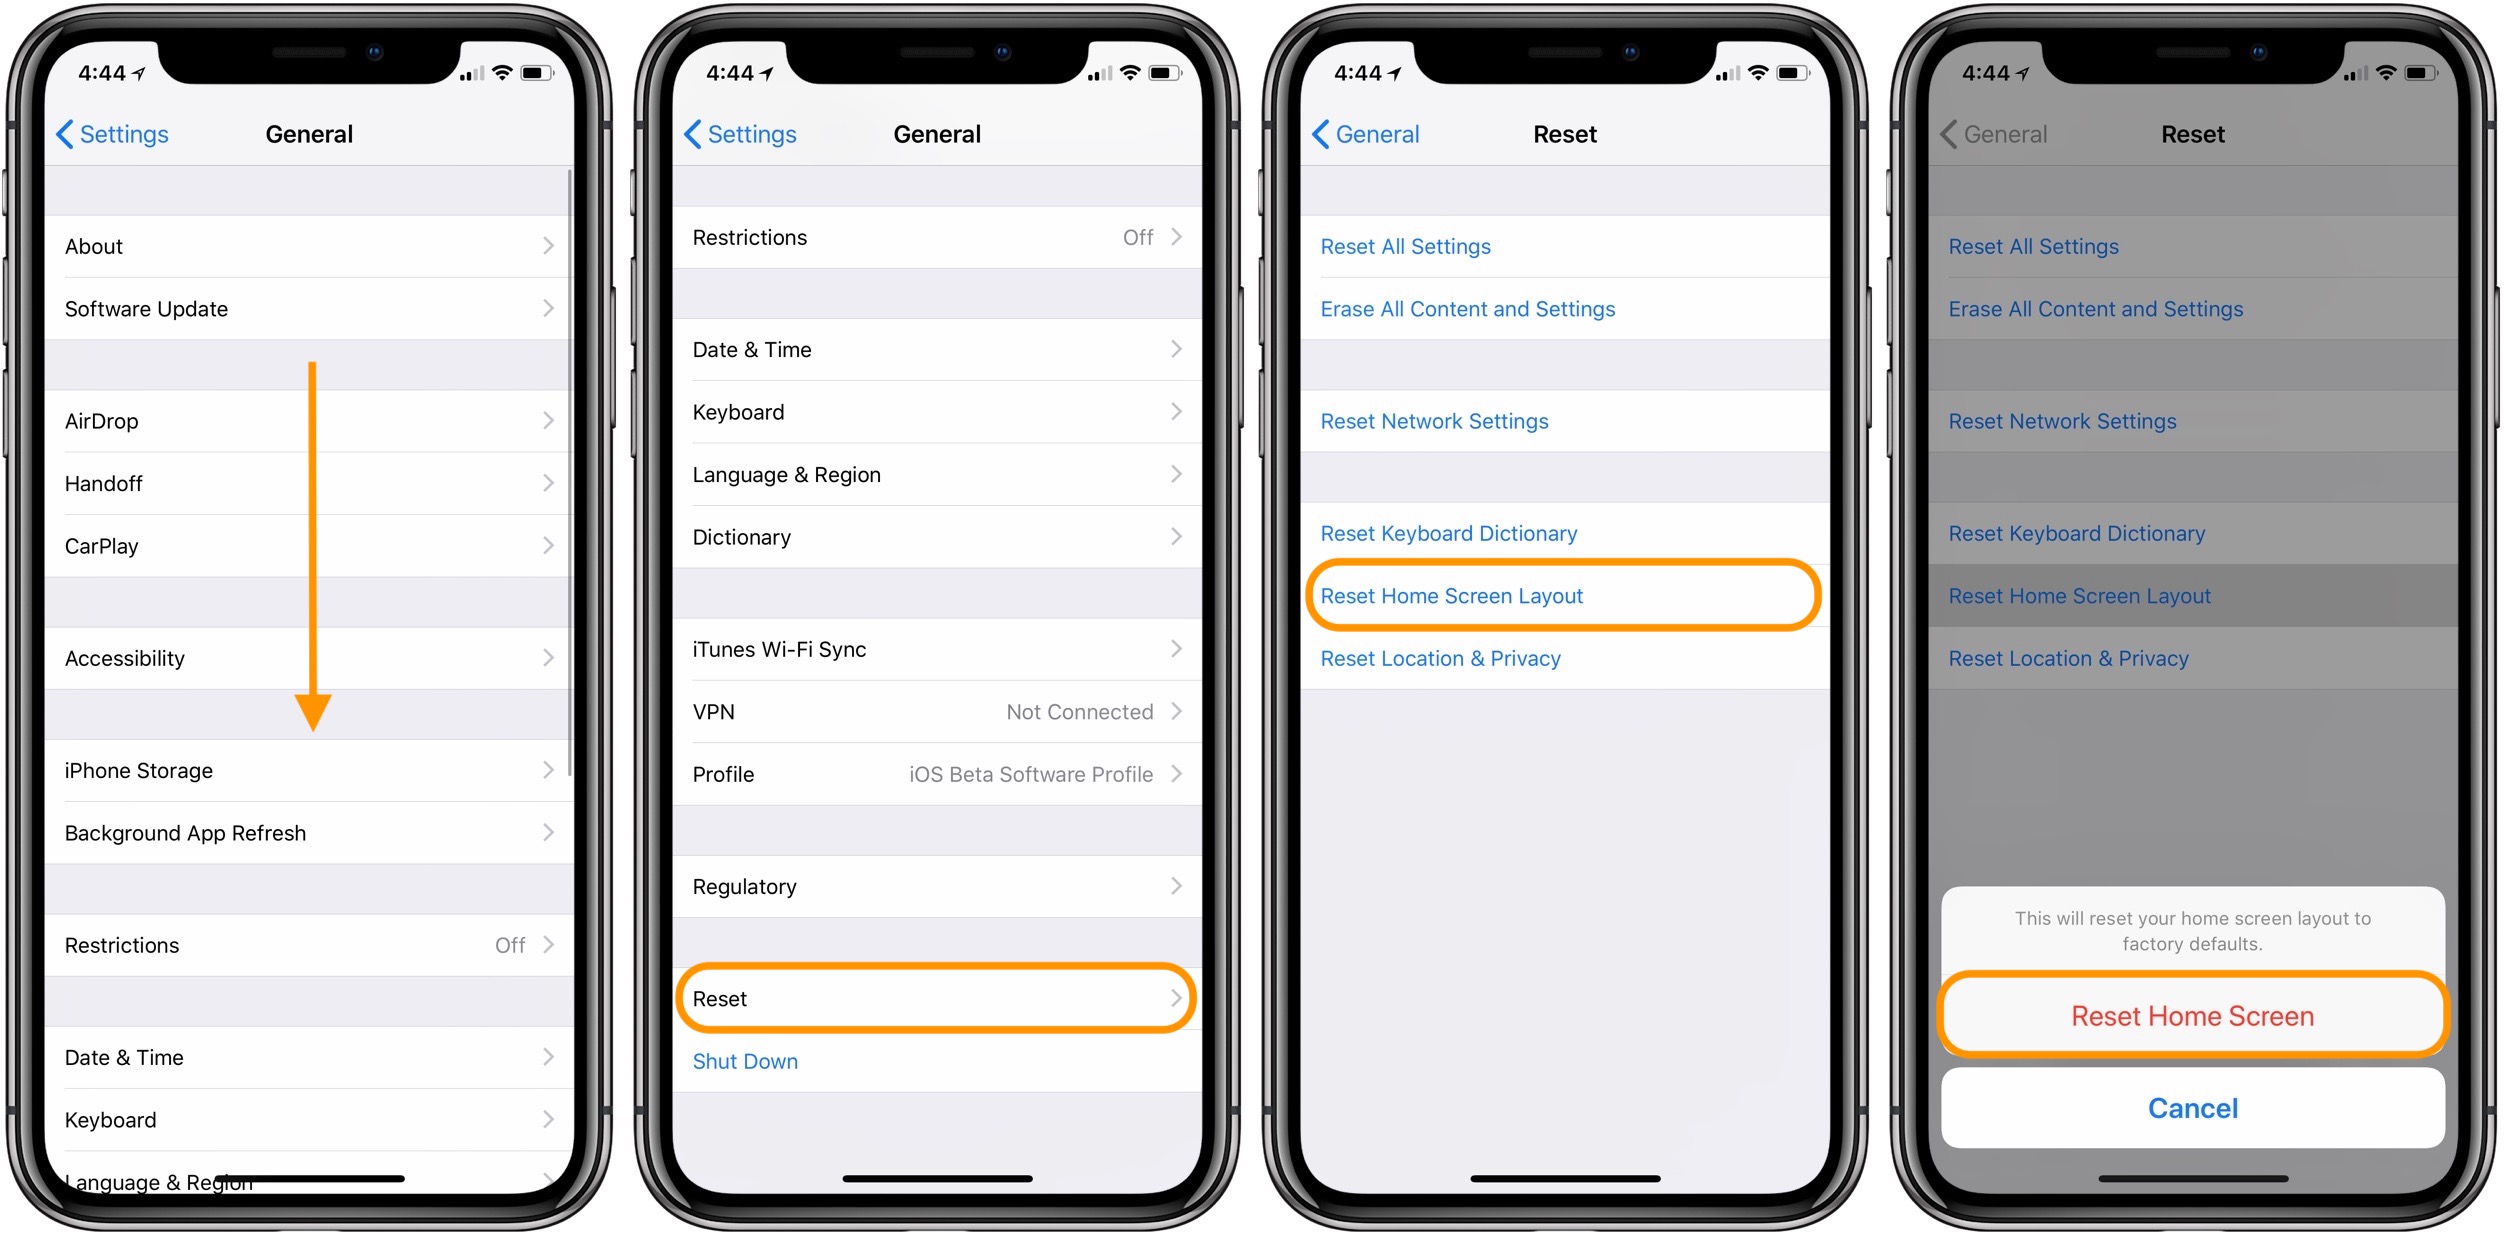
- Tap Reset All Settings, and then enter the password for your device.
- Tap Reset All Settings.
- Follow the steps to change your choices again. This won't change your user info or passwords, but it will reset settings like the color of your screen, how your Home Screen looks, and what your wallpaper is. It also deletes the protected password for your copy.
- Connect your device to the Finder or iTunes again and make a new protected backup.
You won't be able to use protected backups from before, but you can use Finder or iTunes to back up your current files and set a new backup password. You can't change the password on a computer with iOS 10or lower. Try the following in this case.
- Ask the person who set up your gadget for the password.
- Instead, use an iCloud backup. You can make an iCloud backup if you don't already have one.
- Use an older iTunes or Finder copy.
How To Reset Your iPhone Without Password
It can be annoying to forget the password for your iPhone, especially if it has important information on it. There are ways to change your iPhone password if you forget it, so you won't lose any important information. In this piece, we'll talk about different ways to get back into your iPhone while keeping your important information safe.
Use Itunes To Reset The Passcode
iTunes is one of the most popular ways to change an iPhone password that has been forgotten. For this method to work, you must have synced your device with iTunes on a computer you can trust. Here are some ways to do it.
Use Icloud's Find My iPhone Feature
If you have set up Find My iPhone and have access to iCloud, you can use this way to change your PIN from a distance. Using iCloud's Find My iPhone tool, you can directly erase your iPhone and change the password. But you should know that this method only works if your iPhone has a stable internet link and Find My iPhone is turned on.
Reset Iphone Without Passcode Using Itunes Or Finder
There are a few ways to get past the password on your iPhone without losing the information you've saved. In this part, we'll look at 3 methods that have been tried and true.
Using Itunes (If You Have Itunes Backup)
Before you can use this method, you must have backed up your iPhone to iTunes. This will let you use the most recent backup to get your data back after the iPhone passcode and device are both erased. You will be asked to choose a new password once the process is done. This way only requires an iPhone that is locked with a PIN, a lightning wire, and a computer with iTunes backed up. Here's a full explanation.
- Connect your iPhone to your computer with the lightning cord, and then open iTunes. If you are asked for a password, reboot your phone while it is still linked to the computer.
- Select your iPhone on the iTunes window and then click Restore Backup.
- In the next box, you can see a list of files. Choose the most recent one and then click Restore. If asked for a password, give the password for your protected backup.
- You might be asked to turn off 'Find My iPhone'. You will need to start Recovery Mode at this point.
- Hold the buttons down until you see a screen like the one in the picture below.
- iTunes will show a message that says "Restore." Click "Restore and Update" and wait for the process to finish. You can also use Recovery Mode to try to recover your iPhone without updating.
- It will start up again. Make sure it stays attached until the sync is done. After that, you can disconnect it. Voila!
Restore Using Mac Or Pc (With Finder)
If your iPhone is locked and you can't connect it to the internet, you can put it in recovery mode and use a computer to fix it. Use the Finder on a Mac with macOS Catalina or later. Use iTunes on a Mac with a version of macOS before Mojave or a Windows PC.
- Connect the iPhone to the computer with the right Lightning cord.
- Start iTunes or Finder, depending on what you need.
- Now, put your iPhone into Recovery Mode. Depending on the model, the steps are different. Just keep up. Don't let go of the buttons until you see a black screen with a wire pointing toward a laptop. This is the restore mode. Even if you see the "slide to power off" screen or the Apple sign, don't leave the buttons.
- Once your iPhone is in Recovery Mode, iTunes or Finder will show a popup asking you to Restore or Update. Choose Restore, and then do what it says.
- When the process is done, you can set up your iPhone as if it were brand new or recover it using iCloud or a computer, if you have one.
How To Restore Backup After Resetting The iPhone
It's important to restore your backup to get your data and settings back after restarting your iPhone, whether you did it because you forgot your PIN or for some other reason. In this part, we'll show you how to restore your backup after you've restarted your iPhone. This will make sure you can get back to your important information.
Create A Backup Before Resetting
Before getting into how to restore your backup, it's important to stress how important it is to make a backup before restarting your iPhone. If you have a recent backup, it's easy to get your info and settings back, so you won't lose as much. Here's how to make a copy of something.
- Get your iPhone connected to a Wi-Fi network.
- Tap your Apple ID at the top of the "Settings" menu.
- From the menu for your Apple ID, choose "iCloud."
- Scroll down and tap "iCloud Backup."
- If "iCloud Backup" is not already turned on, toggle it on.
- Tap "Back Up Now" to start the process of backing up.
- Make sure your iPhone stays connected to Wi-Fi until the process is done.
It's important to make a backup before you restart your iPhone so that you can easily recover your info afterward.
How To Change Your iPhone Passcode
Changing your iPhone password often is a good way to keep your device and personal information safe. In this part, we'll show you how to change your iPhone password, so you can keep your device safe and keep your privacy under your control.

How to change the passcode on your iPhone, iPad, or iPod touch | Apple Support
Accessing Passcode Settings
To change the PIN on your iPhone, you have to go to the password settings. Here's what you should do.
- Open the "Settings" app from the home screen of your iPhone.
- Scroll down and tap "Face ID & Passcode" (or "Touch ID & Passcode" for devices with Touch ID).
- If asked, you'll need to enter your current password to move forward.
- You are now in the password settings menu, where you can change your PIN.
By doing these steps, you'll find it easy to get to your iPhone's password settings and change your PIN.
Changing Your Passcode
You can change your password once you're in the passcode settings menu. To change your password, do these things.
- Tap the "Change Passcode" choice, or "Change Passcode" again if your device has Touch ID.
- If asked, type in your current password once more.
- You can now choose a new password type from "Custom Alphanumeric Code," "Custom Numeric Code," or "4-Digit Numeric Code." Choose the choice that best fits your needs.
- If you choose the "Custom Alphanumeric Code" choice, you can use a mix of letters, numbers, and symbols to make a more complicated password. If you choose "Custom Numeric Code" or "4-Digit Numeric Code," you will be asked to enter the number password you want.
- Enter your new password and then enter it again to make sure it is correct.
- Once you accept your new password, it will be set and will be needed to open your iPhone.
By doing these steps, you'll be able to easily change your iPhone password to a new one. This will make your device and personal information more secure.
People Also Ask
Can Apple Support Unlock My Iphone Without Resetting It?
No, Apple Support can't get into your iPhone without wiping it clean.
Can I Set Up My iPhone With A New Apple Id After I've Reset It?
Yes, you can set up your iPhone after rebooting it with a different Apple ID.
Can I Change The Password On My Iphone Without Losing The Info On It?
No, you can't change the iPhone password without wiping the device, which means you'll lose all the info on it.
Conclusion
I hope that you have understood how to reset forgotten iPhone passcode without losing data. You can hard reset your iPhone without a PIN if you use one of the above methods. Even if you don't know your Apple ID password, you can restart your iPhone all the way.
AnyUnlock is an easy way to remove an iPhone password and reboot an iPhone. I hope this post helps you solve your problem. If you have any good ideas, feel free to leave them in the comments.

Daniel Barrett
Author
Latest Articles
Popular Articles