How To Compress Video On iPhone Or iPad
In this article, we explain how to compress video on iPhone or iPad. Compressing the video to reduce the size is quite simple using the righ tool.
Author:Daniel BarrettMay 29, 20221889 Shares157431 Views
Capturing videos with your iPhone or iPad is convenient and easy. However, those video files can be pretty large. This takes up more space on your device, but it can make sending or sharing videos difficult.
Compressing the video to reduce the size is quite simple using the right tool. And once those files are smaller, you’ll save space on your iPhone or iPad and have an easier time sharing them on social mediaor sending them in Mail or Messages.
Here’s how to compress video on an iPhone or iPad to reduce the file size or lower the video definition quality. Unfortunately, compressing video is not a feature built into iOS natively, so we’ll rely on a free third-party app that does the job quite well.
This approach is taking a video file that is already recorded and stored on the iPhone or iPad and compressing it. If you want to make a smaller video file size, to begin with, you can change from using 4K video capture to 1080p or 720p ahead of time. Next, we’ll use Video Compressor to shrink down and reduce the file size and definition of a video in iOS.
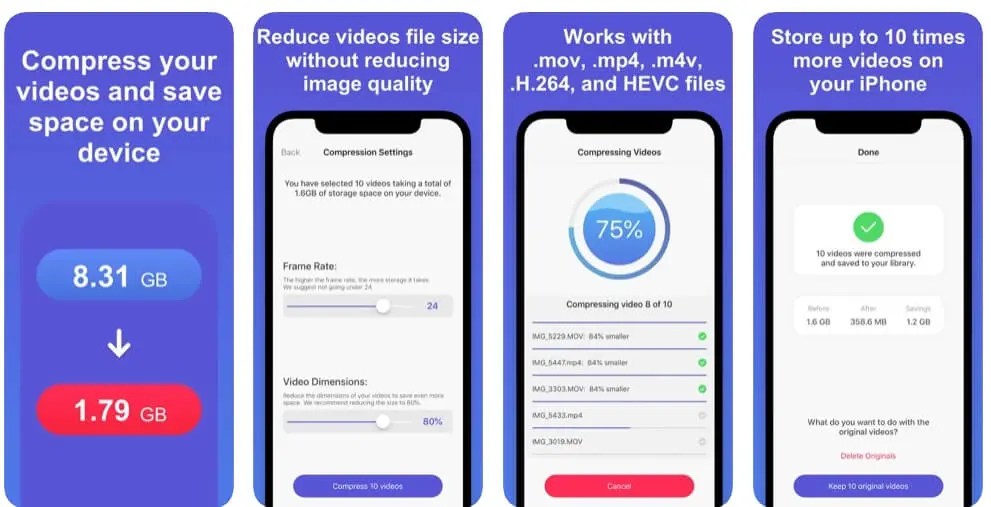
The iPad supports up to 128GB of file storage and 1080p video recording for iPad users, so you can quickly run out of space when creating high-definition videos. These files can take a long time to upload or transfer to a computer, but several App Store programs enable you to compress them to a much smaller size. Depending on the final quality you desire, you can save up to 99 percent of the hard drive space used by your original files.
How to Compress Videos from iPhone and iPad with Video Compressor
Shrink videos with Compress Videos
Pop open Compress Videos, allow it to access your photo library and then tap the button on the main screen to get started.
- Grab Video Compressor for iOS on the App Store. It’s free and works on iPhones and iPads.
- Launch the Video Compressor app on the iPhone or iPad after you have downloaded it
- Select the video location from the top, such as All Videos, Favorites, Recently Added, or any of your albums.
- The app shows videos on your device or in your iCloud Photo Library and the file size of each video, which helps identify the larger ones. Choose one or more videos and tap the Next button on the top right.
- This takes us to adjust the video dimensions from 100% (the full size of your video) to something smaller such as the recommended 80%. Unless you watch your videos on a big screen such as a TV, reducing the dimensions to 80% will not notice the picture quality.
Note:You can feel free to adjust the compressions settings to your liking. It would help if you toyed around with the settings and see what works best for you.
- Tap the Compress button located at the bottom of the screen. You’ll notice the video compressing already.
- Your installed app will compress the video and save it to your library and a newly created album called Compressed videos. You can see how much storage space was saved during the process on that screen.
Note:Compressing videos on iPhone and iPad can be easy and take just a few minutes when using the right tool. But I’ll discuss a few steps for iPad users to compress videos on their device easily.
Also read:How to Convert the TIFF to PNG
How to Compress Videos from iPad using Video Compressor or Video Slimmer
Install Video-Compression Software
Open the App Store on your iPad and download a video-compression program, such as Video Compressor or Video Slimmer.
The compression process works essentially the same way for both programs, and you can choose the output video quality from the settings menu after choosing a file. First, select a video from your iPad library by tapping the “Add” button and browsing your video albums. Next, tap “Settings” and choose a compression level, such as “720p,” “VGA Quality,” or “Low Quality.”
Note that the more you compress the video, the more detail you remove from the file, resulting in a lower quality. After selecting your settings, tap “Compress.” Depending on the file size and compression level, the process can take several minutes to an hour.

Daniel Barrett
Author
Latest Articles
Popular Articles